<img loading='lazy' style='display: none;' data-attachment-id-target='0' src=''><img loading='lazy' style='display: none;' data-attachment-id-target='2878' src='https://www.theprojectgroup.com/blog/wp-content/uploads/2017/07/Bild1_PlanungsoptionMSProject.png'><img loading='lazy' style='display: none;' data-attachment-id-target='2879' src='https://www.theprojectgroup.com/blog/wp-content/uploads/2017/07/Bild2_PlanungsoptionMSProject.png'><img loading='lazy' style='display: none;' data-attachment-id-target='2880' src='https://www.theprojectgroup.com/blog/wp-content/uploads/2017/07/Bild3_PlanungsoptionMSProject.png'><img loading='lazy' style='display: none;' data-attachment-id-target='2881' src='https://www.theprojectgroup.com/blog/wp-content/uploads/2017/07/Bild4_PlanungsoptionMSProject.png'><img loading='lazy' style='display: none;' data-attachment-id-target='2882' src='https://www.theprojectgroup.com/blog/wp-content/uploads/2017/07/Bild5_PlanungsoptionMSProject.png'><img loading='lazy' style='display: none;' data-attachment-id-target='2883' src='https://www.theprojectgroup.com/blog/wp-content/uploads/2017/07/Bild6_PlanungsoptionMSProject.png'><img loading='lazy' style='display: none;' data-attachment-id-target='2884' src='https://www.theprojectgroup.com/blog/wp-content/uploads/2017/07/Bild7_PlanungsoptionMSProject.png'><img loading='lazy' style='display: none;' data-attachment-id-target='2885' src='https://www.theprojectgroup.com/blog/wp-content/uploads/2017/07/Bild8_PlanungsoptionMSProject.png'><img loading='lazy' style='display: none;' data-attachment-id-target='2886' src='https://www.theprojectgroup.com/blog/wp-content/uploads/2017/07/Bild9_PlanungsoptionMSProject.png'><img loading='lazy' style='display: none;' data-attachment-id-target='2887' src='https://www.theprojectgroup.com/blog/wp-content/uploads/2017/07/Bild10_PlanungsoptionMSProject.png'><img loading='lazy' style='display: none;' data-attachment-id-target='2888' src='https://www.theprojectgroup.com/blog/wp-content/uploads/2017/07/Bild11_PlanungsoptionMSProject.png'><img loading='lazy' style='display: none;' data-attachment-id-target='2889' src='https://www.theprojectgroup.com/blog/wp-content/uploads/2017/07/Bild12_PlanungsoptionMSProject.png'><img loading='lazy' style='display: none;' data-attachment-id-target='0' src=''><img loading='lazy' style='display: none;' data-attachment-id-target='2890' src='https://www.theprojectgroup.com/blog/wp-content/uploads/2017/07/Bild13_PlanungsoptionMSProject.png'><img loading='lazy' style='display: none;' data-attachment-id-target='2891' src='https://www.theprojectgroup.com/blog/wp-content/uploads/2017/07/Bild14_PlanungsoptionMSProject.png'><img loading='lazy' style='display: none;' data-attachment-id-target='2892' src='https://www.theprojectgroup.com/blog/wp-content/uploads/2017/07/Bild15_PlanungsoptionMSProject.png'><img loading='lazy' style='display: none;' data-attachment-id-target='2893' src='https://www.theprojectgroup.com/blog/wp-content/uploads/2017/07/Bild16_PlanungsoptionMSProject.png'><img loading='lazy' style='display: none;' data-attachment-id-target='2894' src='https://www.theprojectgroup.com/blog/wp-content/uploads/2017/07/Bild17_PlanungsoptionMSProject.png'><img loading='lazy' style='display: none;' data-attachment-id-target='2895' src='https://www.theprojectgroup.com/blog/wp-content/uploads/2017/07/Bild18_PlanungsoptionMSProject.png'><img loading='lazy' style='display: none;' data-attachment-id-target='0' src=''><img loading='lazy' style='display: none;' data-attachment-id-target='2896' src='https://www.theprojectgroup.com/blog/wp-content/uploads/2017/07/Bild19_PlanungsoptionMSProject.png'><img loading='lazy' style='display: none;' data-attachment-id-target='2897' src='https://www.theprojectgroup.com/blog/wp-content/uploads/2017/07/Bild20_PlanungsoptionMSProject.png'><img loading='lazy' style='display: none;' data-attachment-id-target='2912' src='https://www.theprojectgroup.com/blog/wp-content/uploads/2017/07/Bild21_PlanungsoptionMSProject-3.png'><img loading='lazy' style='display: none;' data-attachment-id-target='2913' src='https://www.theprojectgroup.com/blog/wp-content/uploads/2017/07/Bild22_PlanungsoptionMSProject-1.png'><img loading='lazy' style='display: none;' data-attachment-id-target='2914' src='https://www.theprojectgroup.com/blog/wp-content/uploads/2017/07/Bild23_PlanungsoptionMSProject-1.png'><img loading='lazy' style='display: none;' data-attachment-id-target='2915' src='https://www.theprojectgroup.com/blog/wp-content/uploads/2017/07/Bild24_PlanungsoptionMSProject-1.png'><img loading='lazy' style='display: none;' data-attachment-id-target='2903' src='https://www.theprojectgroup.com/blog/wp-content/uploads/2017/07/Bild26_PlanungsoptionMSProject.png'><img loading='lazy' style='display: none;' data-attachment-id-target='2917' src='https://www.theprojectgroup.com/blog/wp-content/uploads/2017/07/Bild26_PlanungsoptionMSProject-1.png'><img loading='lazy' style='display: none;' data-attachment-id-target='2918' src='https://www.theprojectgroup.com/blog/wp-content/uploads/2017/07/Bild27_PlanungsoptionMSProject-1.png'><img loading='lazy' style='display: none;' data-attachment-id-target='2919' src='https://www.theprojectgroup.com/blog/wp-content/uploads/2017/07/Bild28_PlanungsoptionMSProject-1.png'><img loading='lazy' style='display: none;' data-attachment-id-target='2920' src='https://www.theprojectgroup.com/blog/wp-content/uploads/2017/07/Bild29_PlanungsoptionMSProject-1.png'><img loading='lazy' style='display: none;' data-attachment-id-target='0' src=''><img loading='lazy' style='display: none;' data-attachment-id-target='10893' src='https://www.theprojectgroup.com/blog/wp-content/uploads/2023/06/MartinGbunt.jpg'><img loading='lazy' style='display: none;' data-attachment-id-target='0' src=''>{"id":2877,"date":"2023-07-28T14:00:21","date_gmt":"2023-07-28T12:00:21","guid":{"rendered":"https:\/\/www.theprojectgroup.com\/blog\/?p=2877"},"modified":"2024-07-03T16:04:00","modified_gmt":"2024-07-03T14:04:00","slug":"ms-project-planungsoptionen","status":"publish","type":"post","link":"https:\/\/www.theprojectgroup.com\/blog\/ms-project-planungsoptionen\/","title":{"rendered":"MS Project Planungsoptionen \u2013 Erkl\u00e4rungen und Empfehlungen f\u00fcr passende Einstellungen"},"content":{"rendered":"<p>Dies ist der zweite Teil der Blog-Reihe<a href=\"#Reihe\"> \u201eReine Einstellungssache \u2013 die Optionen in MS Project\u201c<\/a>. In diesem geht es um die Frage, wie sich die vielen verschiedenen <strong>MS Project Planungsoptionen <\/strong>auf das Verhalten des Tools auswirken<em>. <\/em>Sie lernen mit praktischen Tipps, was Sie beachten sollten und welche Optionseinstellungen Sie f\u00fcr Ihre Projektplanung wann nutzen sollten.<\/p>\n<p>Diese Kapitel warten auf Sie:<\/p>\n<ul>\n<li><a href=\"#Kapitel1\">Planungsoptionen in MS Project<\/a><\/li>\n<li><a href=\"#Kapitel2\">Vorg\u00e4nge manuell oder automatisch planen in MS Project<\/a><\/li>\n<li><a href=\"#Kapitel3\">\u201eEinf\u00fcge\u201c-Datum\u201c f\u00fcr neue Vorg\u00e4nge<\/a><\/li>\n<li><a href=\"#Kapitel4\">Einheiten f\u00fcr Dauer und Arbeit festlegen<\/a><\/li>\n<li><a href=\"#Kapitel5\">Standardvorgangsart festlegen<\/a><\/li>\n<li><a href=\"#Kapitel6\">MS Project Zuordnungseinheiten<\/a><\/li>\n<li><a href=\"#Kapitel7\">Leistungssteuerung<\/a><\/li>\n<li><a href=\"#Kapitel8\">Automatisches Verkn\u00fcpfen von Vorg\u00e4ngen<\/a><\/li>\n<li><a href=\"#Kapitel9\">Automatische Unterbrechung von Vorg\u00e4ngen<\/a><\/li>\n<li><a href=\"#Kapitel10\">Manuell geplante Vorg\u00e4nge aktualisieren<\/a><\/li>\n<li><a href=\"#Kapitel11\">MS Project Einschr\u00e4nkungstermine<\/a><\/li>\n<li><a href=\"#Kapitel12\">Gesch\u00e4tzte Dauern<\/a><\/li>\n<li><a href=\"#Kapitel13\">Vorgang am n\u00e4chstgelegenen Arbeitstag halten<\/a><\/li>\n<li><a href=\"#Kapitel14\">Zusammenfassung<\/a><\/li>\n<\/ul>\n<p>Los geht&#8217;s!<\/p>\n\n    <p class=\"datamintsbanner\">\n        <a href=\"\" target=\"_blank\" class=\"datamintsbanner__link\" title=\"Motorworld Event (TPG Webinar)\" style=\"display: block;\">\n            <img data-attachment-id=\"0\"decoding=\"async\" src=\"\" class=\"datamintsbanner__image\" style=\"display: block; max-width: 100%\">\n        <\/a>\n    <\/p>\n    \n<h2 id=\"Kapitel1\">Planungsoptionen in MS Project<\/h2>\n<p>
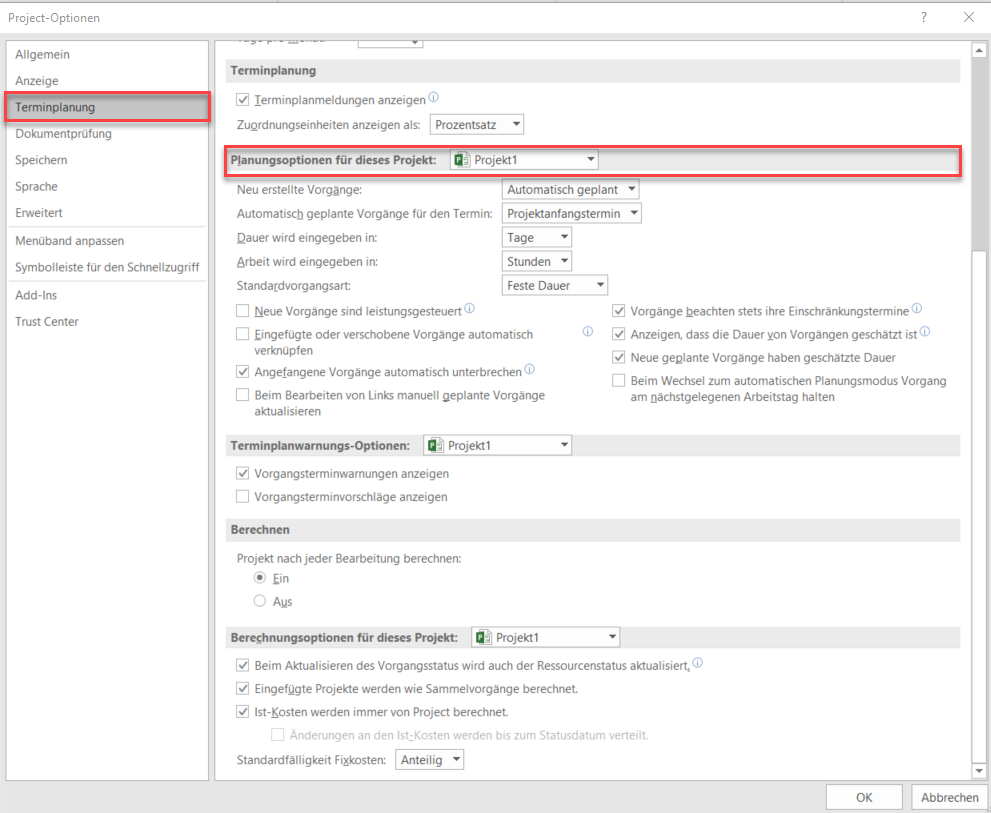
Einen Blick in die zentralen MS Project Optionen sollten Sie immer dann werfen, wenn die Berechnungsergebnisse des Tools nicht mit Ihren Erwartungen \u00fcbereinstimmen. Haben Sie die Grundeinstellungen in den zentralen Optionen korrekt vorgenommen?<\/p>\n<p>Um zu den Planungsoptionen f\u00fcr Ihr Projekt zu gelangen, klicken Sie auf den Reiter <em>Datei<\/em> und w\u00e4hlen Sie dort <em>Optionen<\/em> aus. Die <em>Project-Optionen<\/em> werden angezeigt. Hier w\u00e4hlen Sie <em>Terminplanung<\/em>.<\/p>\n<figure id=\"attachment_2878\" aria-describedby=\"caption-attachment-2878\" style=\"width: 700px\" class=\"wp-caption aligncenter\"><a href=\"https:\/\/www.theprojectgroup.com\/blog\/wp-content\/uploads\/2017\/07\/Bild1_PlanungsoptionMSProject.png\" target=\"_blank\" rel=\"noopener noreferrer\"><img data-attachment-id=\"2878\"loading=\"lazy\" decoding=\"async\" class=\"wp-image-2878\" src=\"https:\/\/www.theprojectgroup.com\/blog\/wp-content\/uploads\/2017\/07\/Bild1_PlanungsoptionMSProject.png\" alt=\"MS Project Planungsoptionen\" width=\"700\" height=\"574\" srcset=\"https:\/\/www.theprojectgroup.com\/blog\/wp-content\/uploads\/2017\/07\/Bild1_PlanungsoptionMSProject.png 991w, https:\/\/www.theprojectgroup.com\/blog\/wp-content\/uploads\/2017\/07\/Bild1_PlanungsoptionMSProject-300x246.png 300w, https:\/\/www.theprojectgroup.com\/blog\/wp-content\/uploads\/2017\/07\/Bild1_PlanungsoptionMSProject-768x630.png 768w, https:\/\/www.theprojectgroup.com\/blog\/wp-content\/uploads\/2017\/07\/Bild1_PlanungsoptionMSProject-168x137.png 168w\" sizes=\"(max-width: 700px) 100vw, 700px\" \/><\/a><figcaption id=\"caption-attachment-2878\" class=\"wp-caption-text\">Planungsoptionen f\u00fcr ein Projekt aufrufen<\/figcaption><\/figure>\n<div id=\"id695740d52d06a\" class=\"iframecontainer iframecontainer--hidden\">\n            <div class=\"iframecontainer__head\" style=\"background: #D60B52!important;\">\n                <div class=\"iframecontainer__head__inner\" style=\"color:#ffffff;\" data-for=\"#id695740d52d06a\">\n                    <p><strong>Download (PDF):<\/strong> 11 Schritte zum optimalen MS Project Projektplan (Tutorial)<\/p>\n                <\/div>\n                <div class=\"iframecontainer__head__icon\" data-for=\"#id695740d52d06a\">\n                    <svg width=\"10px\" height=\"16px\" viewBox=\"1092 550 10 16\" version=\"1.1\" xmlns=\"http:\/\/www.w3.org\/2000\/svg\" xmlns:xlink=\"http:\/\/www.w3.org\/1999\/xlink\">\n                        <polygon class=\"iframecontainer__head__icon__pfeil\"  data-for=\"#id695740d52d06a\" stroke=\"none\" fill=\"#ffffff\" fill-rule=\"evenodd\" points=\"1093.875 550 1101.875 558 1093.875 566 1092 564.125 1098.125 558 1092 551.875\"><\/polygon>\n                    <\/svg>\n                <\/div>\n            <\/div>\n            <div class=\"iframecontainer__iframe\">\n                <div class=\"iframecontainer__iframe__inner\">\n                    <p>Vermeiden Sie mit diesem Tutorial von Beginn an typische Stolperfallen, \u00fcber die Neulinge in MS Project sich gerne den Kopf zerbrechen, unsicher werden und Zeit verschwendet. Das wird Ihnen nicht passieren!<\/p>\n<p><span style=\"font-size: xx-small;\">* Pflichtfeld\u00a0 |\u00a0 <a href=\"https:\/\/www.theprojectgroup.com\/de\/datenschutz\/\" target=\"_blank\" rel=\"noopener\">Datenschutzhinweise<\/a><\/span><\/p>\n<div class=\"cookieconsent-optout-marketing\">Dieses Formular wird durch Ihre Cookie-Einstellung zu unserer Website blockiert. Bitte <a>klicken Sie hier<\/a> und w\u00e4hlen Sie mindestens die Marketing-Cookies aus. Dann wird dieses Formular angezeigt. Vielen Dank.<\/div>\n\n                \t<!-- DEUTSCH: Wichtig: nur den Code in data-download-asset \u00e4ndern - definiert Download -->\r\n<script type='text\/x-ccm-loader' data-ccm-loader-src=\"https:\/\/js-eu1.hsforms.net\/forms\/embed\/developer\/146642994.js\" defer><\/script>\r\n\r\n<div class=\"hs-form-html\"\r\n     data-download-asset=\"CU9D\"\r\n     data-region=\"eu1\"\r\n     data-form-id=\"32ae4d32-4e61-47ed-90d3-c7a25b28719d\"\r\n     data-portal-id=\"146642994\"><\/div>\r\n\r\n<script>\r\n(() => {\r\n  const FORM_ID = '32ae4d32-4e61-47ed-90d3-c7a25b28719d';\r\n  const FIELD   = '0-1\/download_asset';\r\n  const roots   = new Set();\r\n  const formsByRoot = new WeakMap();\r\n\r\n  const setViaApi = (root) => {\r\n    const code = root.dataset.downloadAsset || '';\r\n    const form = formsByRoot.get(root);\r\n    if (!code || !form) return;\r\n    form.setFieldValue(FIELD, code);\r\n  };\r\n\r\n  \/\/ 1) Wenn das Formular ready ist: Form-Instanz holen + Wert via API setzen\r\n  window.addEventListener('hs-form-event:on-ready', (event) => {\r\n    if (!window.HubSpotFormsV4) return;\r\n    const form = HubSpotFormsV4.getFormFromEvent(event);\r\n    if (!form || form.getFormId() !== FORM_ID) return;\r\n\r\n    const root = [...roots].find(r => r.contains(event.target));\r\n    if (!root) return;\r\n\r\n    formsByRoot.set(root, form);\r\n    setViaApi(root);\r\n  });\r\n\r\n  \/\/ 2) Kurz vor dem Absenden nochmal setzen (globaler Callback)\r\n  window.addEventListener('message', (event) => {\r\n    const d = event.data;\r\n    if (!d || d.type !== 'hsFormCallback' || d.eventName !== 'onFormSubmit') return;\r\n    if (d.id !== FORM_ID) return;\r\n\r\n    roots.forEach(setViaApi);\r\n  });\r\n\r\n  \/\/ Boot\r\n  document.addEventListener('DOMContentLoaded', () => {\r\n    document.querySelectorAll('.hs-form-html[data-download-asset][data-form-id=\"' + FORM_ID + '\"]')\r\n      .forEach(r => roots.add(r));\r\n  });\r\n})();\r\n<\/script>\n                    <style>\/* Kompaktere Darstellung f\u00fcr HubSpot Formulare *\/\n[data-hsfc-id=\"Renderer\"] .hsfc-Step .hsfc-Step__Content { padding: 0 20px 20px !important; }\n[data-hsfc-id=Renderer] .hsfc-TextField>*:not(:last-child) { margin-bottom:4px !important; }\n[data-hsfc-id=\"Renderer\"] .hsfc-Row { gap: 20px !important; margin-bottom: 12px !important; }\n[data-hsfc-id=\"Renderer\"] .hsfc-NavigationRow { margin-top: 6px !important; }\n[data-hsfc-id=\"Renderer\"] .hsfc-TextInput { padding: 8px !important; }<\/style>\n                <\/div>\n            <\/div>\n        <\/div><h2 id=\"Kapitel2\">Vorg\u00e4nge manuell oder automatisch planen in MS Project<\/h2>\n<h3>MS Project manuell planen<\/h3>\n<p>Die M\u00f6glichkeit, Vorg\u00e4nge manuell zu planen (Option: <em>Neu erstellte Vorg\u00e4nge<\/em>), wurde mit der MS Project Version 2010 eingef\u00fchrt. Dieser Vorgangsmodus sollte den Nutzern den Einstieg in die Projektplanung mit MS Project erleichtern.<\/p>\n<p>In diesem Modus k\u00f6nnen Sie Anfangs und Endtermine frei eingeben und \u201eExcel-like\u201c Ihren Projektplan entwickeln, ohne dass st\u00e4ndig im Hintergrund Berechnungen ausgef\u00fchrt werden. <strong><em>Manuell geplant<\/em> ist die Standardeinstellung von MS Project.<\/strong><\/p>\n<h3>MS Project automatisch planen<\/h3>\n<p>Meine Empfehlung ist jedoch der Planungsmodus<em> Automatisch geplant<\/em>. Der Grund hierf\u00fcr ist einfach: Wenn MS Project etwas wirklich sehr gut kann, dann ist es das Berechnen von kalendarische Anfangs- und Endterminen. Und diese unbestreitbare St\u00e4rke des Tools sollten Sie nutzen. <strong>Lassen Sie also MS Project rechnen!<\/strong><\/p>\n<blockquote><p>Hinweis: Die Einstellungen, die Sie hier treffen, sind nicht in Stein gemei\u00dfelt. Jederzeit k\u00f6nnen Sie den Planungsmodus im Reiter <em>Vorgang<\/em> oder in jedem Vorgang direkt im Feld <em>Vorgangsmodus<\/em> umstellen. Die folgenden Screens zeigen dies.<\/p><\/blockquote>\n<figure id=\"attachment_2879\" aria-describedby=\"caption-attachment-2879\" style=\"width: 900px\" class=\"wp-caption alignnone\"><a href=\"https:\/\/www.theprojectgroup.com\/blog\/wp-content\/uploads\/2017\/07\/Bild2_PlanungsoptionMSProject.png\"><img data-attachment-id=\"2879\"loading=\"lazy\" decoding=\"async\" class=\"wp-image-2879\" src=\"https:\/\/www.theprojectgroup.com\/blog\/wp-content\/uploads\/2017\/07\/Bild2_PlanungsoptionMSProject.png\" alt=\"Planungsoptionen MS Project - Vorgangsmodus festlegen\" width=\"900\" height=\"68\" srcset=\"https:\/\/www.theprojectgroup.com\/blog\/wp-content\/uploads\/2017\/07\/Bild2_PlanungsoptionMSProject.png 1915w, https:\/\/www.theprojectgroup.com\/blog\/wp-content\/uploads\/2017\/07\/Bild2_PlanungsoptionMSProject-300x23.png 300w, https:\/\/www.theprojectgroup.com\/blog\/wp-content\/uploads\/2017\/07\/Bild2_PlanungsoptionMSProject-768x58.png 768w, https:\/\/www.theprojectgroup.com\/blog\/wp-content\/uploads\/2017\/07\/Bild2_PlanungsoptionMSProject-1024x78.png 1024w\" sizes=\"(max-width: 900px) 100vw, 900px\" \/><\/a><figcaption id=\"caption-attachment-2879\" class=\"wp-caption-text\">Vorgangsmodus festlegen \u00fcber das Men\u00fcband Vorgang<\/figcaption><\/figure>\n<figure id=\"attachment_2880\" aria-describedby=\"caption-attachment-2880\" style=\"width: 776px\" class=\"wp-caption aligncenter\"><a href=\"https:\/\/www.theprojectgroup.com\/blog\/wp-content\/uploads\/2017\/07\/Bild3_PlanungsoptionMSProject.png\"><img data-attachment-id=\"2880\"loading=\"lazy\" decoding=\"async\" class=\"wp-image-2880 size-full\" src=\"https:\/\/www.theprojectgroup.com\/blog\/wp-content\/uploads\/2017\/07\/Bild3_PlanungsoptionMSProject.png\" alt=\"Planungsoptionen in MS Project - Vorgangsfeld \" width=\"776\" height=\"131\" srcset=\"https:\/\/www.theprojectgroup.com\/blog\/wp-content\/uploads\/2017\/07\/Bild3_PlanungsoptionMSProject.png 776w, https:\/\/www.theprojectgroup.com\/blog\/wp-content\/uploads\/2017\/07\/Bild3_PlanungsoptionMSProject-300x51.png 300w, https:\/\/www.theprojectgroup.com\/blog\/wp-content\/uploads\/2017\/07\/Bild3_PlanungsoptionMSProject-768x130.png 768w\" sizes=\"(max-width: 776px) 100vw, 776px\" \/><\/a><figcaption id=\"caption-attachment-2880\" class=\"wp-caption-text\">Vorgangsmodus festlegen \u00fcber das Vorgangsfeld Vorgangsmodus<\/figcaption><\/figure>\n<h2 id=\"Kapitel3\">\u201eEinf\u00fcge\u201c-Datum\u201c f\u00fcr neue Vorg\u00e4nge<\/h2>\n<p>Mit der Option <em>Automatisch geplante Vorg\u00e4nge f\u00fcr den Termin\u00a0<\/em>k\u00f6nnen Sie festlegen, zu welchen Zeitpunkt Ihre neu angelegten Vorg\u00e4nge beginnen sollen. Der Vorgabewert ist der <em>Projektanfangstermin<\/em>.<\/p>\n<p>Alternativ k\u00f6nnen Sie auch <em>Aktuelles Datum<\/em> w\u00e4hlen. Diese Option ist sinnvoll, wenn Ihr Projekt bereits l\u00e4ngere Zeit l\u00e4uft und Sie nun neue Vorg\u00e4nge hinzuf\u00fcgen m\u00f6chten. Die neuen Vorg\u00e4nge beginnen dann zum aktuellen Datum. Sie m\u00fcssen also nicht mehr im Projektplan hin und her scrollen, um zu diesen\u00a0Vorg\u00e4ngen zu gelangen.<\/p>\n<h2 id=\"Kapitel4\">Einheiten f\u00fcr Dauer und Arbeit festlegen<\/h2>\n<p>Standard in MS Project ist zudem, dass die <em>Dauer<\/em> in Tagen (Option: <em>Dauer wird eingegeben in)<\/em> und die<em> Arbeit <\/em>in Stunden (Option: <em>Arbeit wird eingegeben in<\/em>) eingegeben werden. Sie k\u00f6nnen diese Einstellungen aber \u00e4ndern.<\/p>\n<p>Die jeweiligen Auswahllisten bieten die Einheiten <em>Minuten<\/em>, <em>Stunden<\/em>, <em>Tage<\/em>, <em>Wochen<\/em> oder <em>Monate<\/em> an.<\/p>\n<p>Der Umstand, dass <em>Dauer<\/em> und <em>Arbeit<\/em> in unterschiedlichen Einheiten erfasst werden, reduziert die Verwechslungsgefahr. Letztlich bleibt es aber Ihnen \u00fcberlassen, welche Einstellungen Sie w\u00e4hlen.<\/p>\n<blockquote><p><strong>Tipp:<\/strong> Es geht hier nicht um richtig oder falsch, sondern darum, welche Einstellung Sie in Ihrer konkreten Planungssituation am besten unterst\u00fctzt.<\/p><\/blockquote>\n<h2 id=\"Kapitel5\">Standardvorgangsart festlegen<\/h2>\n<p>Wie Sie die Standardvorgangsart festlegen, h\u00e4ngt von Ihren Pr\u00e4ferenzen bzw. Planungsvorgehen ab. Es ist dann relevant, wenn Sie Arbeitsressourcen auf Vorg\u00e4nge zuweisen.<\/p>\n<p>Bei MS Project gibt es diese drei Vorgangsarten (die Links f\u00fcrhen Sie zu den Blog-Artikeln, in denen die jeweilige Vorgangsart im Detail behandelt wird):<\/p>\n<ul>\n<li><a href=\"https:\/\/www.theprojectgroup.com\/blog\/ms-project-feste-einheiten\/\" target=\"_blank\" rel=\"noopener\"><em>Feste Einheiten<\/em><\/a><\/li>\n<li><a href=\"https:\/\/www.theprojectgroup.com\/blog\/ms-project-feste-arbeit\/\" target=\"_blank\" rel=\"noopener\"><em>Feste Arbeit<\/em><\/a><\/li>\n<li><a href=\"https:\/\/www.theprojectgroup.com\/blog\/ms-project-feste-dauer\/\" target=\"_blank\" rel=\"noopener\"><em>Feste Dauer<\/em><\/a> (MS Project Standardeinstellung)<\/li>\n<\/ul>\n<p>F\u00fcr die nachfolgenden Beispiele verwende ich Ressourcen, deren<em> Max. Einheiten <\/em>100% bzw. 50% bezogen auf einen 8 Stundenarbeitstag betragen. Die Vorg\u00e4nge sind nicht leistungsgesteuert.<\/p>\n<h3>Berechnungslogik<\/h3>\n<p>Das unterschiedliche Verhalten der Vorgangsarten h\u00e4ngt mit der Berechnungslogik in MS Project zusammen. MS Project verwendet folgende Formel bei seinen Berechnungen:<\/p>\n<p><strong>Dauer = Arbeit \/ (Einheiten in % * Stunden pro Tag)<\/strong><\/p>\n<p>Wenn die Dauer eines Vorgangs vorgegeben ist und dann eine Ressource mit festem Einheitenwert zugewiesen wird, berechnet MS Project die Arbeit. Wird einem Vorgang mit einer Dauer von 5 Tagen eine Ressource zu 100% zugewiesen, ergibt sich ein Arbeitsvolumen in H\u00f6he von 40 Stunden.<\/p>\n<h3>Feste Arbeit<\/h3>\n<p><em>Feste Arbeit<\/em> als Vorgabe bietet sich an, wenn Sie<\/p>\n<ul>\n<li>prim\u00e4r Arbeitsvolumen von Vorg\u00e4ngen planen und m\u00f6chten, dass dieses konstant bleibt,<\/li>\n<li>die Dauer \u00e4ndern oder<\/li>\n<li>Ressourcen hinzuf\u00fcgen oder abziehen.<\/li>\n<\/ul>\n<p>Die untenstehende Abbildung zeigt die Ausgangssituation. Anna soll 40 Stunden Arbeit in 5 Tagen erledigen.<\/p>\n<figure id=\"attachment_2881\" aria-describedby=\"caption-attachment-2881\" style=\"width: 900px\" class=\"wp-caption alignleft\"><a href=\"https:\/\/www.theprojectgroup.com\/blog\/wp-content\/uploads\/2017\/07\/Bild4_PlanungsoptionMSProject.png\"><img data-attachment-id=\"2881\"loading=\"lazy\" decoding=\"async\" class=\"wp-image-2881\" src=\"https:\/\/www.theprojectgroup.com\/blog\/wp-content\/uploads\/2017\/07\/Bild4_PlanungsoptionMSProject.png\" alt=\"Planungsoptionen in MS Project - feste Arbeit\" width=\"900\" height=\"95\" srcset=\"https:\/\/www.theprojectgroup.com\/blog\/wp-content\/uploads\/2017\/07\/Bild4_PlanungsoptionMSProject.png 1436w, https:\/\/www.theprojectgroup.com\/blog\/wp-content\/uploads\/2017\/07\/Bild4_PlanungsoptionMSProject-300x32.png 300w, https:\/\/www.theprojectgroup.com\/blog\/wp-content\/uploads\/2017\/07\/Bild4_PlanungsoptionMSProject-768x81.png 768w, https:\/\/www.theprojectgroup.com\/blog\/wp-content\/uploads\/2017\/07\/Bild4_PlanungsoptionMSProject-1024x108.png 1024w\" sizes=\"(max-width: 900px) 100vw, 900px\" \/><\/a><figcaption id=\"caption-attachment-2881\" class=\"wp-caption-text\">Ausgangssituation bei &#8222;Feste Arbeit&#8220;<\/figcaption><\/figure>\n<p>\u00c4ndern Sie die Dauer des Vorgangs, so bleibt das Arbeitsvolumen von 40 Stunden konstant. Anna erh\u00e4lt lediglich mehr Zeit, um dieses Arbeitsvolumen zu erledigen, n\u00e4mlich 7 Tage.<\/p>\n<figure id=\"attachment_2882\" aria-describedby=\"caption-attachment-2882\" style=\"width: 900px\" class=\"wp-caption alignleft\"><a href=\"https:\/\/www.theprojectgroup.com\/blog\/wp-content\/uploads\/2017\/07\/Bild5_PlanungsoptionMSProject.png\"><img data-attachment-id=\"2882\"loading=\"lazy\" decoding=\"async\" class=\"wp-image-2882\" src=\"https:\/\/www.theprojectgroup.com\/blog\/wp-content\/uploads\/2017\/07\/Bild5_PlanungsoptionMSProject.png\" alt=\"Planungsoptionen in MS Project - Erh\u00f6hung der Dauer\" width=\"900\" height=\"94\" srcset=\"https:\/\/www.theprojectgroup.com\/blog\/wp-content\/uploads\/2017\/07\/Bild5_PlanungsoptionMSProject.png 1437w, https:\/\/www.theprojectgroup.com\/blog\/wp-content\/uploads\/2017\/07\/Bild5_PlanungsoptionMSProject-300x31.png 300w, https:\/\/www.theprojectgroup.com\/blog\/wp-content\/uploads\/2017\/07\/Bild5_PlanungsoptionMSProject-768x80.png 768w, https:\/\/www.theprojectgroup.com\/blog\/wp-content\/uploads\/2017\/07\/Bild5_PlanungsoptionMSProject-1024x107.png 1024w\" sizes=\"(max-width: 900px) 100vw, 900px\" \/><\/a><figcaption id=\"caption-attachment-2882\" class=\"wp-caption-text\">Erh\u00f6hung der Dauer bei &#8222;feste Arbeit&#8220;<\/figcaption><\/figure>\n<p>&nbsp;<\/p>\n<p>Kehren wir zur Ausgangssituation zur\u00fcck und weisen Bernd als Unterst\u00fctzung f\u00fcr Anna zu. In diesem Fall wird das Arbeitsvolumen von 40 Stunden auf zwei Ressourcen verteilt, die je eine Verf\u00fcgbarkeit von 100% haben. Beide zusammen ben\u00f6tigen nur noch 2,5 Tage zur Erledigung des Arbeitsvolumens in H\u00f6he von 40 Stunden.<\/p>\n<figure id=\"attachment_2883\" aria-describedby=\"caption-attachment-2883\" style=\"width: 900px\" class=\"wp-caption alignnone\"><a href=\"https:\/\/www.theprojectgroup.com\/blog\/wp-content\/uploads\/2017\/07\/Bild6_PlanungsoptionMSProject.png\"><img data-attachment-id=\"2883\"loading=\"lazy\" decoding=\"async\" class=\"wp-image-2883\" src=\"https:\/\/www.theprojectgroup.com\/blog\/wp-content\/uploads\/2017\/07\/Bild6_PlanungsoptionMSProject.png\" alt=\"Planungsoptionen in MS Project - weitere Ressource\" width=\"900\" height=\"91\" srcset=\"https:\/\/www.theprojectgroup.com\/blog\/wp-content\/uploads\/2017\/07\/Bild6_PlanungsoptionMSProject.png 1484w, https:\/\/www.theprojectgroup.com\/blog\/wp-content\/uploads\/2017\/07\/Bild6_PlanungsoptionMSProject-300x30.png 300w, https:\/\/www.theprojectgroup.com\/blog\/wp-content\/uploads\/2017\/07\/Bild6_PlanungsoptionMSProject-768x78.png 768w, https:\/\/www.theprojectgroup.com\/blog\/wp-content\/uploads\/2017\/07\/Bild6_PlanungsoptionMSProject-1024x104.png 1024w\" sizes=\"(max-width: 900px) 100vw, 900px\" \/><\/a><figcaption id=\"caption-attachment-2883\" class=\"wp-caption-text\">Zuweisung einer weiteren Ressource bei feste Arbeit<\/figcaption><\/figure>\n<h3>Feste Einheiten<\/h3>\n<p>Die Vorgangsart <em>Feste Einheiten<\/em> bietet sich dann f\u00fcr Sie an,<\/p>\n<ul>\n<li>wenn Sie Mitarbeitende immer mit einer festen Verf\u00fcgbarkeit f\u00fcr einen Vorgang einplanen m\u00fcssen und<\/li>\n<li>dieser Einheitenwert bei \u00c4nderung der Dauer oder des Arbeitsvolumens konstant bleiben soll.<\/li>\n<\/ul>\n<p>Das untenstehende Beispiel zeigt eine Zuordnung von Bernd zu 50% auf den Vorgang. In den 5 Tagen soll Bernd 20 Stunden Arbeit leisten.<\/p>\n<figure id=\"attachment_2884\" aria-describedby=\"caption-attachment-2884\" style=\"width: 900px\" class=\"wp-caption alignleft\"><a href=\"https:\/\/www.theprojectgroup.com\/blog\/wp-content\/uploads\/2017\/07\/Bild7_PlanungsoptionMSProject.png\"><img data-attachment-id=\"2884\"loading=\"lazy\" decoding=\"async\" class=\"wp-image-2884\" src=\"https:\/\/www.theprojectgroup.com\/blog\/wp-content\/uploads\/2017\/07\/Bild7_PlanungsoptionMSProject.png\" alt=\"Planungsoptionen in MS Project - \" width=\"900\" height=\"80\" srcset=\"https:\/\/www.theprojectgroup.com\/blog\/wp-content\/uploads\/2017\/07\/Bild7_PlanungsoptionMSProject.png 1412w, https:\/\/www.theprojectgroup.com\/blog\/wp-content\/uploads\/2017\/07\/Bild7_PlanungsoptionMSProject-300x27.png 300w, https:\/\/www.theprojectgroup.com\/blog\/wp-content\/uploads\/2017\/07\/Bild7_PlanungsoptionMSProject-768x69.png 768w, https:\/\/www.theprojectgroup.com\/blog\/wp-content\/uploads\/2017\/07\/Bild7_PlanungsoptionMSProject-1024x91.png 1024w\" sizes=\"(max-width: 900px) 100vw, 900px\" \/><\/a><figcaption id=\"caption-attachment-2884\" class=\"wp-caption-text\">Ausgangssituation bei &#8222;Feste Einheiten&#8220;<\/figcaption><\/figure>\n<p>Erh\u00f6hen Sie die Dauer um einen Tag auf 6 Tage, so berechnet MS Project das Arbeitsvolumen neu. Es steigt um 4 Stunden auf 24 Stunden.<\/p>\n<figure id=\"attachment_2885\" aria-describedby=\"caption-attachment-2885\" style=\"width: 900px\" class=\"wp-caption alignleft\"><a href=\"https:\/\/www.theprojectgroup.com\/blog\/wp-content\/uploads\/2017\/07\/Bild8_PlanungsoptionMSProject.png\"><img data-attachment-id=\"2885\"loading=\"lazy\" decoding=\"async\" class=\"wp-image-2885\" src=\"https:\/\/www.theprojectgroup.com\/blog\/wp-content\/uploads\/2017\/07\/Bild8_PlanungsoptionMSProject.png\" alt=\"Planungsoptionen in MS Project - H\u00f6here Dauer \" width=\"900\" height=\"87\" srcset=\"https:\/\/www.theprojectgroup.com\/blog\/wp-content\/uploads\/2017\/07\/Bild8_PlanungsoptionMSProject.png 1322w, https:\/\/www.theprojectgroup.com\/blog\/wp-content\/uploads\/2017\/07\/Bild8_PlanungsoptionMSProject-300x29.png 300w, https:\/\/www.theprojectgroup.com\/blog\/wp-content\/uploads\/2017\/07\/Bild8_PlanungsoptionMSProject-768x74.png 768w, https:\/\/www.theprojectgroup.com\/blog\/wp-content\/uploads\/2017\/07\/Bild8_PlanungsoptionMSProject-1024x99.png 1024w\" sizes=\"(max-width: 900px) 100vw, 900px\" \/><\/a><figcaption id=\"caption-attachment-2885\" class=\"wp-caption-text\">Bild 8: Erh\u00f6hung der Dauer bei &#8222;Feste Einheiten&#8220;<\/figcaption><\/figure>\n<p>Kehren wir zur Ausgangssituation zur\u00fcck und reduzieren das Arbeitsvolumen von 20 auf 12 Stunden, so berechnet MS Project eine Dauer von 3 Tagen, da Bernd ja fest mit 50% (4 Stunden pro Tag) eingeplant wird.<\/p>\n<figure id=\"attachment_2886\" aria-describedby=\"caption-attachment-2886\" style=\"width: 900px\" class=\"wp-caption alignnone\"><a href=\"https:\/\/www.theprojectgroup.com\/blog\/wp-content\/uploads\/2017\/07\/Bild9_PlanungsoptionMSProject.png\"><img data-attachment-id=\"2886\"loading=\"lazy\" decoding=\"async\" class=\"wp-image-2886\" src=\"https:\/\/www.theprojectgroup.com\/blog\/wp-content\/uploads\/2017\/07\/Bild9_PlanungsoptionMSProject.png\" alt=\"Planungsoptionen in MS Project - Arbeit reduzieren\" width=\"900\" height=\"82\" srcset=\"https:\/\/www.theprojectgroup.com\/blog\/wp-content\/uploads\/2017\/07\/Bild9_PlanungsoptionMSProject.png 1320w, https:\/\/www.theprojectgroup.com\/blog\/wp-content\/uploads\/2017\/07\/Bild9_PlanungsoptionMSProject-300x27.png 300w, https:\/\/www.theprojectgroup.com\/blog\/wp-content\/uploads\/2017\/07\/Bild9_PlanungsoptionMSProject-768x70.png 768w, https:\/\/www.theprojectgroup.com\/blog\/wp-content\/uploads\/2017\/07\/Bild9_PlanungsoptionMSProject-1024x93.png 1024w\" sizes=\"(max-width: 900px) 100vw, 900px\" \/><\/a><figcaption id=\"caption-attachment-2886\" class=\"wp-caption-text\">Reduzierung der Arbeit bei &#8222;Feste Einheiten&#8220;<\/figcaption><\/figure>\n<h3>Feste Dauer<\/h3>\n<p>Wenn bei Ihrer Projektplanung die Zeit entscheidet ist, so bietet es sich an, mit der Vorgangsart <em>Feste Dauer<\/em> zu planen. Sie geben einen Zeitraum vor, in dem die Arbeit zu erledigen ist, ohne dass dieser Zeitraum neu berechnet wird, wenn sich Arbeitsvolumen oder die Zuweisungseinheiten \u00e4ndern.<\/p>\n<p>Die folgende Abbildung stellt die Ausgangssituation dar. Chris soll 20 Stunden Arbeit in 5 Tagen erledigen. Der Zuweisungswert von Chris auf den Vorgang betr\u00e4gt somit 50%.<\/p>\n<figure id=\"attachment_2887\" aria-describedby=\"caption-attachment-2887\" style=\"width: 900px\" class=\"wp-caption alignnone\"><a href=\"https:\/\/www.theprojectgroup.com\/blog\/wp-content\/uploads\/2017\/07\/Bild10_PlanungsoptionMSProject.png\"><img data-attachment-id=\"2887\"loading=\"lazy\" decoding=\"async\" class=\"wp-image-2887\" src=\"https:\/\/www.theprojectgroup.com\/blog\/wp-content\/uploads\/2017\/07\/Bild10_PlanungsoptionMSProject.png\" alt=\"Planungsoptionen in MS Project\" width=\"900\" height=\"75\" srcset=\"https:\/\/www.theprojectgroup.com\/blog\/wp-content\/uploads\/2017\/07\/Bild10_PlanungsoptionMSProject.png 1330w, https:\/\/www.theprojectgroup.com\/blog\/wp-content\/uploads\/2017\/07\/Bild10_PlanungsoptionMSProject-300x25.png 300w, https:\/\/www.theprojectgroup.com\/blog\/wp-content\/uploads\/2017\/07\/Bild10_PlanungsoptionMSProject-768x64.png 768w, https:\/\/www.theprojectgroup.com\/blog\/wp-content\/uploads\/2017\/07\/Bild10_PlanungsoptionMSProject-1024x85.png 1024w\" sizes=\"(max-width: 900px) 100vw, 900px\" \/><\/a><figcaption id=\"caption-attachment-2887\" class=\"wp-caption-text\">Ausgangssituation bei &#8222;Feste Dauer&#8220;<\/figcaption><\/figure>\n<p>Erh\u00f6hen Sie die Arbeit auf 30 Stunden, so \u00e4ndert MS Project die prozentuale Zuweisung von Chris auf den Vorgang. Sie betr\u00e4gt nicht mehr 50%, sondern 75% \u2013 auch wenn MS Project Ihnen diese \u00c4nderung nicht im Gantt anzeigt.<\/p>\n<figure id=\"attachment_2888\" aria-describedby=\"caption-attachment-2888\" style=\"width: 900px\" class=\"wp-caption alignleft\"><a href=\"https:\/\/www.theprojectgroup.com\/blog\/wp-content\/uploads\/2017\/07\/Bild11_PlanungsoptionMSProject.png\"><img data-attachment-id=\"2888\"loading=\"lazy\" decoding=\"async\" class=\"wp-image-2888\" src=\"https:\/\/www.theprojectgroup.com\/blog\/wp-content\/uploads\/2017\/07\/Bild11_PlanungsoptionMSProject.png\" alt=\"Planungsoptionen in MS Project\" width=\"900\" height=\"86\" srcset=\"https:\/\/www.theprojectgroup.com\/blog\/wp-content\/uploads\/2017\/07\/Bild11_PlanungsoptionMSProject.png 1344w, https:\/\/www.theprojectgroup.com\/blog\/wp-content\/uploads\/2017\/07\/Bild11_PlanungsoptionMSProject-300x29.png 300w, https:\/\/www.theprojectgroup.com\/blog\/wp-content\/uploads\/2017\/07\/Bild11_PlanungsoptionMSProject-768x73.png 768w, https:\/\/www.theprojectgroup.com\/blog\/wp-content\/uploads\/2017\/07\/Bild11_PlanungsoptionMSProject-1024x98.png 1024w\" sizes=\"(max-width: 900px) 100vw, 900px\" \/><\/a><figcaption id=\"caption-attachment-2888\" class=\"wp-caption-text\">Erh\u00f6hung der Arbeit bei &#8222;Feste Dauer&#8220;<\/figcaption><\/figure>\n<p>MS Project hat aber tats\u00e4chlich die prozentuale Zuweisung von Chris f\u00fcr diesen Vorgang neu berechnet.<\/p>\n<p>Um Ihnen dies zu zeigen, verwende ich eine geteilte Ansicht. Im oberen Teil wird weiterhin die Gantt-Ansicht verwendet. Im unteren Teil der Ansicht habe ich Ansicht <em>Vorgang Einsatz<\/em> ausgew\u00e4hlt.<\/p>\n<p>Zus\u00e4tzlich habe ich die Spalte <em>Zuordnungseinheiten<\/em> in die Tabelle auf der rechten Seite eingef\u00fcgt. Und links in der Tabelle ist die Zeile<em> % Zuteilung<\/em>\u00a0eingeblendet.<\/p>\n<figure id=\"attachment_2889\" aria-describedby=\"caption-attachment-2889\" style=\"width: 900px\" class=\"wp-caption alignleft\"><a href=\"https:\/\/www.theprojectgroup.com\/blog\/wp-content\/uploads\/2017\/07\/Bild12_PlanungsoptionMSProject.png\"><img data-attachment-id=\"2889\"loading=\"lazy\" decoding=\"async\" class=\"wp-image-2889\" src=\"https:\/\/www.theprojectgroup.com\/blog\/wp-content\/uploads\/2017\/07\/Bild12_PlanungsoptionMSProject.png\" alt=\"Planungsoptionen in MS Project - % Zuteilung \" width=\"900\" height=\"356\" srcset=\"https:\/\/www.theprojectgroup.com\/blog\/wp-content\/uploads\/2017\/07\/Bild12_PlanungsoptionMSProject.png 1918w, https:\/\/www.theprojectgroup.com\/blog\/wp-content\/uploads\/2017\/07\/Bild12_PlanungsoptionMSProject-300x119.png 300w, https:\/\/www.theprojectgroup.com\/blog\/wp-content\/uploads\/2017\/07\/Bild12_PlanungsoptionMSProject-768x304.png 768w, https:\/\/www.theprojectgroup.com\/blog\/wp-content\/uploads\/2017\/07\/Bild12_PlanungsoptionMSProject-1024x405.png 1024w\" sizes=\"(max-width: 900px) 100vw, 900px\" \/><\/a><figcaption id=\"caption-attachment-2889\" class=\"wp-caption-text\">% Zuteilung auf einen Vorgang<\/figcaption><\/figure>\n<p>Sie sehen, dass MS Project in der Gantt Ansicht weiterhin 50% angezeigt. Auch die Zuordnungseinheiten im unteren linken Teil der Ansicht werden weiterhin mit 50% angegeben. Die Zuweisung auf den Vorgang selbst ist jedoch mit 75% erfolgt.<\/p>\n\n    <p class=\"datamintsbanner\">\n        <a href=\"https:\/\/bit.ly\/3OkEHIx\" target=\"_blank\" class=\"datamintsbanner__link\" title=\"Meilensteintrendanalyse MTA Kostenlos Download MicrosoftProject MSProject FreeMTA Projektmanagement\" style=\"display: block;\">\n            <img data-attachment-id=\"0\"decoding=\"async\" src=\"https:\/\/www.theprojectgroup.com\/blog\/wp-content\/uploads\/2022\/07\/TPG_Header_1400_MTA-Client_de.jpg\" class=\"datamintsbanner__image\" style=\"display: block; max-width: 100%\">\n        <\/a>\n    <\/p>\n    \n<h2 id=\"Kapitel6\">MS Project Zuordnungseinheiten \u2013 Besonderheit im Gantt-Chart<\/h2>\n<p>Bei dem hier beschriebenen Verhalten handelt es sich um eine Besonderheit von MS Project, die die Nutzenden immer wieder irritiert. Letztlich rechnet MS Project zwar richtig, dennoch bleibt die Frage, warum MS Project nicht einfach den Wert in der Gantt-Ansicht anzeigt, den die meisten vermutlich erwartet h\u00e4tten? Hier spielen die <strong>Zuordnungseinheiten<\/strong> eine Rolle.<\/p>\n<p><strong>MS Project zeigt in der Gantt-Ansicht den Wert an, mit dem die Ressource bei der Erstzuweisung auf den Vorgang zugewiesen wurde.<\/strong><\/p>\n<p>Es ist auch m\u00f6glich, diesen Wert w\u00e4hrend der Planung zu ver\u00e4ndern. Wenn Sie beispielsweise wollen, dass MS Project diesen Vorgang mit einem <strong>Zuordnungswert<\/strong> von 90% berechnen soll, so \u00e4ndern Sie einfach den Wert in der Spalte <em>Zuordnungseinheiten<\/em>.<\/p>\n<p>In unserem Fall wird die Dauer konstant gehalten (<em>Feste Dauer<\/em>) und die Arbeit neu berechnet, da jetzt mit Zuordnungseinheiten in H\u00f6he von 90% gerechnet wird. In der Gantt-Ansicht wird ebenfalls der Wert 90% angezeigt.<\/p>\n<figure id=\"attachment_2890\" aria-describedby=\"caption-attachment-2890\" style=\"width: 900px\" class=\"wp-caption alignnone\"><a href=\"https:\/\/www.theprojectgroup.com\/blog\/wp-content\/uploads\/2017\/07\/Bild13_PlanungsoptionMSProject.png\"><img data-attachment-id=\"2890\"loading=\"lazy\" decoding=\"async\" class=\"wp-image-2890\" src=\"https:\/\/www.theprojectgroup.com\/blog\/wp-content\/uploads\/2017\/07\/Bild13_PlanungsoptionMSProject.png\" alt=\"Planungsoptionen in MS Project - \u00c4ndern der Zuordnungseinheiten \" width=\"900\" height=\"165\" srcset=\"https:\/\/www.theprojectgroup.com\/blog\/wp-content\/uploads\/2017\/07\/Bild13_PlanungsoptionMSProject.png 1904w, https:\/\/www.theprojectgroup.com\/blog\/wp-content\/uploads\/2017\/07\/Bild13_PlanungsoptionMSProject-300x55.png 300w, https:\/\/www.theprojectgroup.com\/blog\/wp-content\/uploads\/2017\/07\/Bild13_PlanungsoptionMSProject-768x141.png 768w, https:\/\/www.theprojectgroup.com\/blog\/wp-content\/uploads\/2017\/07\/Bild13_PlanungsoptionMSProject-1024x188.png 1024w\" sizes=\"(max-width: 900px) 100vw, 900px\" \/><\/a><figcaption id=\"caption-attachment-2890\" class=\"wp-caption-text\">\u00c4ndern der Zuordnungseinheiten und Anzeige im Gantt-Chart<\/figcaption><\/figure>\n<h2 id=\"Kapitel7\">Leistungssteuerung<\/h2>\n<p>Mit der Option <em>Neue Vorg\u00e4nge sind leistungsgesteuert<\/em>, k\u00f6nnen Sie festlegen, ob die Arbeit eines Vorgangs konstant oder neu berechnet werden soll, wenn dem Vorgang Ressourcen hinzugef\u00fcgt oder entzogen werden.<\/p>\n<p>Das bedeutet bei Vorg\u00e4ngen der Art F<em>este Arbeit<\/em> oder F<em>este Einheiten,<\/em> dass sich die Vorgangsdauer bei aktivierter <a href=\"https:\/\/www.theprojectgroup.com\/blog\/ms-project-leistungssteuerung\/\" target=\"_blank\" rel=\"noopener\">Leistungssteuerung<\/a>:<\/p>\n<ul>\n<li>verk\u00fcrzt, wenn eine zus\u00e4tzliche Ressource dem Vorgang zugewiesen wird<\/li>\n<li>verl\u00e4ngert, wenn eine Ressource abgezogen wird.<\/li>\n<\/ul>\n<p>Die nachfolgende Abbildung zeigt die Ausgangssituation f\u00fcr die Vorg\u00e4nge <em>Task 1 und 2<\/em> (Zeile 1 und 2). Beide Vorg\u00e4nge sind leistungsgesteuert und es gilt, jeweils ein Arbeitsvolumen in H\u00f6he von 40 Stunden abzuarbeiten.<\/p>\n<figure id=\"attachment_2891\" aria-describedby=\"caption-attachment-2891\" style=\"width: 900px\" class=\"wp-caption alignnone\"><a href=\"https:\/\/www.theprojectgroup.com\/blog\/wp-content\/uploads\/2017\/07\/Bild14_PlanungsoptionMSProject.png\"><img data-attachment-id=\"2891\"loading=\"lazy\" decoding=\"async\" class=\"wp-image-2891\" src=\"https:\/\/www.theprojectgroup.com\/blog\/wp-content\/uploads\/2017\/07\/Bild14_PlanungsoptionMSProject.png\" alt=\"Planungsoptionen in MS Project - Leistungssteuerung\" width=\"900\" height=\"100\" srcset=\"https:\/\/www.theprojectgroup.com\/blog\/wp-content\/uploads\/2017\/07\/Bild14_PlanungsoptionMSProject.png 1372w, https:\/\/www.theprojectgroup.com\/blog\/wp-content\/uploads\/2017\/07\/Bild14_PlanungsoptionMSProject-300x33.png 300w, https:\/\/www.theprojectgroup.com\/blog\/wp-content\/uploads\/2017\/07\/Bild14_PlanungsoptionMSProject-768x86.png 768w, https:\/\/www.theprojectgroup.com\/blog\/wp-content\/uploads\/2017\/07\/Bild14_PlanungsoptionMSProject-1024x114.png 1024w\" sizes=\"(max-width: 900px) 100vw, 900px\" \/><\/a><figcaption id=\"caption-attachment-2891\" class=\"wp-caption-text\">Ausgangssituation bei &#8222;Feste Arbeit&#8220;\u00a0oder &#8222;Feste Einheiten&#8220; mit Leistungssteuerung<\/figcaption><\/figure>\n<p>Weisen Sie nun den Vorg\u00e4ngen je eine weitere Ressource zu, so reduziert sich logischerweise die Dauer der Vorg\u00e4nge auf 2,5 Tage. Jetzt wird das Arbeitsvolumen des Vorgangs von zwei Ressourcen erledigt \u2013 \u00a0mit je 20h Arbeit pro Ressource.<\/p>\n<figure id=\"attachment_2892\" aria-describedby=\"caption-attachment-2892\" style=\"width: 900px\" class=\"wp-caption alignnone\"><a href=\"https:\/\/www.theprojectgroup.com\/blog\/wp-content\/uploads\/2017\/07\/Bild15_PlanungsoptionMSProject.png\"><img data-attachment-id=\"2892\"loading=\"lazy\" decoding=\"async\" class=\"wp-image-2892\" src=\"https:\/\/www.theprojectgroup.com\/blog\/wp-content\/uploads\/2017\/07\/Bild15_PlanungsoptionMSProject.png\" alt=\"Planungsoptionen in MS Project\" width=\"900\" height=\"99\" srcset=\"https:\/\/www.theprojectgroup.com\/blog\/wp-content\/uploads\/2017\/07\/Bild15_PlanungsoptionMSProject.png 1368w, https:\/\/www.theprojectgroup.com\/blog\/wp-content\/uploads\/2017\/07\/Bild15_PlanungsoptionMSProject-300x33.png 300w, https:\/\/www.theprojectgroup.com\/blog\/wp-content\/uploads\/2017\/07\/Bild15_PlanungsoptionMSProject-768x85.png 768w, https:\/\/www.theprojectgroup.com\/blog\/wp-content\/uploads\/2017\/07\/Bild15_PlanungsoptionMSProject-1024x113.png 1024w\" sizes=\"(max-width: 900px) 100vw, 900px\" \/><\/a><figcaption id=\"caption-attachment-2892\" class=\"wp-caption-text\">Anpassung der Dauer bei &#8222;Feste Arbeit&#8220; und &#8222;Feste Einheiten&#8220; mit Leistungssteuerung<\/figcaption><\/figure>\n<p>Ohne Leistungssteuerung w\u00fcrde MS Project bei <em>Task 1<\/em> (feste Einheiten) die Arbeit neu berechnen. Das Arbeitsvolumen w\u00e4re dann 80 Stunden. <em>Task 2<\/em> (feste Arbeit) ist immer leistungsgesteuert. Bei <em>feste Arbeit<\/em> l\u00e4sst sich die Leistungssteuerung nicht deaktivieren.<\/p>\n<p><strong>Auch hier gilt: Die gew\u00e4hlte Option ist nicht richtig oder falsch, sondern richtet sich im Idealfall nach Ihren Pr\u00e4ferenzen und Ihrer Planungssituation.<\/strong><\/p>\n<p>Ich pers\u00f6nlich deaktiviere die Leistungssteuerung immer. Das liegt vielleicht daran, dass ich mich an diese Einstellung in den vielen Jahren, in denen ich mit MS Project arbeite, schlicht gew\u00f6hnt habe.<\/p>\n<h2 id=\"Kapitel8\">Automatisches Verkn\u00fcpfen von Vorg\u00e4ngen<\/h2>\n<p>Mit Hilfe der Option <em>Eingef\u00fcgte oder verschobene Vorg\u00e4nge automatisch verkn\u00fcpfen<\/em> k\u00f6nnen Sie daf\u00fcr sorgen, dass Vorg\u00e4nge in Ihrem Projektplan automatisch verkn\u00fcpft werden.<\/p>\n<p>In der Ausgangssituation sind die Vorg\u00e4nge<em> Task 1, 2 und 3<\/em> (Zeile 1, 2 und 3) bereits miteinander verkn\u00fcpft.<\/p>\n<figure id=\"attachment_2893\" aria-describedby=\"caption-attachment-2893\" style=\"width: 900px\" class=\"wp-caption alignnone\"><a href=\"https:\/\/www.theprojectgroup.com\/blog\/wp-content\/uploads\/2017\/07\/Bild16_PlanungsoptionMSProject.png\"><img data-attachment-id=\"2893\"loading=\"lazy\" decoding=\"async\" class=\"wp-image-2893\" src=\"https:\/\/www.theprojectgroup.com\/blog\/wp-content\/uploads\/2017\/07\/Bild16_PlanungsoptionMSProject.png\" alt=\"Planungsoptionen in MS Project - automatisches Verkn\u00fcpfen\" width=\"900\" height=\"111\" srcset=\"https:\/\/www.theprojectgroup.com\/blog\/wp-content\/uploads\/2017\/07\/Bild16_PlanungsoptionMSProject.png 1475w, https:\/\/www.theprojectgroup.com\/blog\/wp-content\/uploads\/2017\/07\/Bild16_PlanungsoptionMSProject-300x37.png 300w, https:\/\/www.theprojectgroup.com\/blog\/wp-content\/uploads\/2017\/07\/Bild16_PlanungsoptionMSProject-768x95.png 768w, https:\/\/www.theprojectgroup.com\/blog\/wp-content\/uploads\/2017\/07\/Bild16_PlanungsoptionMSProject-1024x126.png 1024w\" sizes=\"(max-width: 900px) 100vw, 900px\" \/><\/a><figcaption id=\"caption-attachment-2893\" class=\"wp-caption-text\">Ausgangssituation f\u00fcr automatisches Verkn\u00fcpfen<\/figcaption><\/figure>\n<p>F\u00fcgen Sie einen neuen Vorgang <em>Task 4<\/em>\u00a0hinzu, so wird dieser automatisch verkn\u00fcpft.<\/p>\n<figure id=\"attachment_2894\" aria-describedby=\"caption-attachment-2894\" style=\"width: 900px\" class=\"wp-caption alignnone\"><a href=\"https:\/\/www.theprojectgroup.com\/blog\/wp-content\/uploads\/2017\/07\/Bild17_PlanungsoptionMSProject.png\"><img data-attachment-id=\"2894\"loading=\"lazy\" decoding=\"async\" class=\"wp-image-2894\" src=\"https:\/\/www.theprojectgroup.com\/blog\/wp-content\/uploads\/2017\/07\/Bild17_PlanungsoptionMSProject.png\" alt=\"Planungsoptionen in MS Project - Neuen Vorgang anlegen\" width=\"900\" height=\"110\" srcset=\"https:\/\/www.theprojectgroup.com\/blog\/wp-content\/uploads\/2017\/07\/Bild17_PlanungsoptionMSProject.png 1488w, https:\/\/www.theprojectgroup.com\/blog\/wp-content\/uploads\/2017\/07\/Bild17_PlanungsoptionMSProject-300x37.png 300w, https:\/\/www.theprojectgroup.com\/blog\/wp-content\/uploads\/2017\/07\/Bild17_PlanungsoptionMSProject-768x94.png 768w, https:\/\/www.theprojectgroup.com\/blog\/wp-content\/uploads\/2017\/07\/Bild17_PlanungsoptionMSProject-1024x125.png 1024w\" sizes=\"(max-width: 900px) 100vw, 900px\" \/><\/a><figcaption id=\"caption-attachment-2894\" class=\"wp-caption-text\">Neuen Vorgang anlegen<\/figcaption><\/figure>\n<figure id=\"attachment_2895\" aria-describedby=\"caption-attachment-2895\" style=\"width: 900px\" class=\"wp-caption alignleft\"><a href=\"https:\/\/www.theprojectgroup.com\/blog\/wp-content\/uploads\/2017\/07\/Bild18_PlanungsoptionMSProject.png\"><img data-attachment-id=\"2895\"loading=\"lazy\" decoding=\"async\" class=\"wp-image-2895\" src=\"https:\/\/www.theprojectgroup.com\/blog\/wp-content\/uploads\/2017\/07\/Bild18_PlanungsoptionMSProject.png\" alt=\"Planungsoptionen in MS Project - automatisch verkn\u00fcpfter neuer Vorgang\" width=\"900\" height=\"128\" srcset=\"https:\/\/www.theprojectgroup.com\/blog\/wp-content\/uploads\/2017\/07\/Bild18_PlanungsoptionMSProject.png 1478w, https:\/\/www.theprojectgroup.com\/blog\/wp-content\/uploads\/2017\/07\/Bild18_PlanungsoptionMSProject-300x43.png 300w, https:\/\/www.theprojectgroup.com\/blog\/wp-content\/uploads\/2017\/07\/Bild18_PlanungsoptionMSProject-768x109.png 768w, https:\/\/www.theprojectgroup.com\/blog\/wp-content\/uploads\/2017\/07\/Bild18_PlanungsoptionMSProject-1024x145.png 1024w\" sizes=\"(max-width: 900px) 100vw, 900px\" \/><\/a><figcaption id=\"caption-attachment-2895\" class=\"wp-caption-text\">Automatisches Verkn\u00fcpfen eines eingef\u00fcgten Vorgangs<\/figcaption><\/figure>\n<p><strong>Ich empfehle, diese Option zu deaktivieren. <\/strong>Meiner Meinung nach sollten sich Vorgangsanordnungen aus dem Inhalt der Aufgabe ergeben und nicht automatisch.<\/p>\n<p>Beispiel: Wenn eine Schulung durchzuf\u00fchren ist und es noch keine Schulungsunterlagen gibt, so ergibt sich zwangsl\u00e4ufig die Abfolge der Vorg\u00e4nge \u2013 zuerst sind die Schulungsunterlagen zu erstellen und erst dann kann die Schulung durchgef\u00fchrt werden.<\/p>\n<p>Letztlich ist aber immer die Projektleiterin oder der Projektleiter f\u00fcr die Planung verantwortlich. Sie oder er muss folglich \u2013 auch wenn dieser Automatismus aktiviert ist \u2013 die automatisch gesetzten Vorgangsanordnungen auf ihre inhaltliche Richtigkeit pr\u00fcfen.<\/p>\n\n    <p class=\"datamintsbanner\">\n        <a href=\"https:\/\/bit.ly\/3vY038o\" target=\"_blank\" class=\"datamintsbanner__link\" title=\"Seminar MS Project Schulung Grundlagen MicrosoftProject Einsteiger Projekt Projektmanagement PM\" style=\"display: block;\">\n            <img data-attachment-id=\"0\"decoding=\"async\" src=\"https:\/\/www.theprojectgroup.com\/blog\/wp-content\/uploads\/2022\/07\/TPG_Header_1400_Project-lernen_de.jpg\" class=\"datamintsbanner__image\" style=\"display: block; max-width: 100%\">\n        <\/a>\n    <\/p>\n    \n<h2 id=\"Kapitel9\">Automatische Unterbrechung von Vorg\u00e4ngen<\/h2>\n<p>Die Option <em>Angefangene Vorg\u00e4nge automatisch unterbrechen<\/em> ist im Zusammenhang mit dem Fortschreiben des Projektplans sehr wichtig.<\/p>\n<p><strong>Ist die Option aktiviert, werden Vorg\u00e4nge beim Fortschreiben des Projekts unterbrochen, wenn sie noch nicht abgeschlossen sind.<\/strong><\/p>\n<p>Ein Beispiel: Sie haben einen Vorgang geplant, der am 10.07.2017 beginnt und am 14.07.2017 endet. Zum Statusdatum 16.07.2017 aktualisieren Sie ihr Projekt.<\/p>\n<p>Von der zust\u00e4ndigen Mitarbeiterin Anna haben Sie die Statusinformation erhalten, dass sie am 10.07.2017 mit der Arbeit begonnen hat, aber nur 3 Tage an der Aufgabe arbeiten konnte.<\/p>\n<p>Sie erfassen also einen Fortschritt <em>60%<\/em> im Feld<em> % Abgeschlossen<\/em>. In der Spalte <em>Unterbrechungstermin<\/em>, die ich zur Verdeutlichung eingeblendet habe, wird der 12. Juli 2017 als Unterbrechungsdatum angezeigt, da Anna am 10., 11. und 12. Juli gearbeitet hat.<\/p>\n<figure id=\"attachment_2896\" aria-describedby=\"caption-attachment-2896\" style=\"width: 900px\" class=\"wp-caption alignnone\"><a href=\"https:\/\/www.theprojectgroup.com\/blog\/wp-content\/uploads\/2017\/07\/Bild19_PlanungsoptionMSProject.png\"><img data-attachment-id=\"2896\"loading=\"lazy\" decoding=\"async\" class=\"wp-image-2896\" src=\"https:\/\/www.theprojectgroup.com\/blog\/wp-content\/uploads\/2017\/07\/Bild19_PlanungsoptionMSProject.png\" alt=\"Planungsoptionen in MS Project - automatisches Unterbrechen\" width=\"900\" height=\"197\" srcset=\"https:\/\/www.theprojectgroup.com\/blog\/wp-content\/uploads\/2017\/07\/Bild19_PlanungsoptionMSProject.png 1222w, https:\/\/www.theprojectgroup.com\/blog\/wp-content\/uploads\/2017\/07\/Bild19_PlanungsoptionMSProject-300x66.png 300w, https:\/\/www.theprojectgroup.com\/blog\/wp-content\/uploads\/2017\/07\/Bild19_PlanungsoptionMSProject-768x168.png 768w, https:\/\/www.theprojectgroup.com\/blog\/wp-content\/uploads\/2017\/07\/Bild19_PlanungsoptionMSProject-1024x225.png 1024w\" sizes=\"(max-width: 900px) 100vw, 900px\" \/><\/a><figcaption id=\"caption-attachment-2896\" class=\"wp-caption-text\">Ausgangssituation f\u00fcr automatisches Unterbrechen<\/figcaption><\/figure>\n<p>Wenn Sie das Projekt mit Hilfe der Funktion <em>Projekt aktualisieren<\/em> zum Statusdatum 16.07.2017 fortschreiben, so wird der Vorgang unterbrochen.<\/p>\n<p>Das bedeutet, dass die Arbeit, die vor dem 16.07.2017 nicht erledigt wurde, in den Zeitraum nach dem 16.07.2017 verschoben wird. Die Unterbrechung wird in Form der gepunkteten Linie angezeigt.<\/p>\n<p><strong>Da es Sinn der Projektfortschreibung ist, nicht erledigte Arbeit in der Vergangenheit in die Zukunft zu verschieben, habe ich diese Option immer aktiviert.<\/strong><\/p>\n<figure id=\"attachment_2897\" aria-describedby=\"caption-attachment-2897\" style=\"width: 900px\" class=\"wp-caption alignnone\"><a href=\"https:\/\/www.theprojectgroup.com\/blog\/wp-content\/uploads\/2017\/07\/Bild20_PlanungsoptionMSProject.png\"><img data-attachment-id=\"2897\"loading=\"lazy\" decoding=\"async\" class=\"wp-image-2897\" src=\"https:\/\/www.theprojectgroup.com\/blog\/wp-content\/uploads\/2017\/07\/Bild20_PlanungsoptionMSProject.png\" alt=\"Planungsoptionen in MS Project - automatisches Unterbrechen\" width=\"900\" height=\"179\" srcset=\"https:\/\/www.theprojectgroup.com\/blog\/wp-content\/uploads\/2017\/07\/Bild20_PlanungsoptionMSProject.png 1345w, https:\/\/www.theprojectgroup.com\/blog\/wp-content\/uploads\/2017\/07\/Bild20_PlanungsoptionMSProject-300x60.png 300w, https:\/\/www.theprojectgroup.com\/blog\/wp-content\/uploads\/2017\/07\/Bild20_PlanungsoptionMSProject-768x152.png 768w, https:\/\/www.theprojectgroup.com\/blog\/wp-content\/uploads\/2017\/07\/Bild20_PlanungsoptionMSProject-1024x203.png 1024w\" sizes=\"(max-width: 900px) 100vw, 900px\" \/><\/a><figcaption id=\"caption-attachment-2897\" class=\"wp-caption-text\">Automatisches Unterbrechen von Vorg\u00e4ngen bei Projektaktualisierung<\/figcaption><\/figure>\n<p>Ist die <strong>Option deaktiviert<\/strong>, so wird\u00a0in der Spalte <em>Unterbrechungstermin<\/em> auch der 12.07.2017 angezeigt. Wird das Projekt aktualisiert, wird der Vorgang aber nicht unterbrochen. Er verharrt also in seiner urspr\u00fcnglichen Position.<\/p>\n<h2 id=\"Kapitel10\">Manuell geplante Vorg\u00e4nge aktualisieren<\/h2>\n<p>MS Project bietet die M\u00f6glichkeit, dass manuell geplante Vorg\u00e4nge beim Verkn\u00fcpfen aktualisiert werden (Option: <em>Beim Bearbeiten von Links manuell geplanter Vorg\u00e4nge aktualisieren<\/em>). Das bedeutet, dass die Anfangs- und Enddaten eines manuell geplanten Vorgangs angepasst werden.<\/p>\n<p>Ob Sie diese Option aktivieren sollten oder nicht, h\u00e4ngt stark davon ab, welchen Planungsmodus Sie nutzen. Planen Sie Ihr Projekt mit manuell geplanten Tasks, so kann das Aktivieren dieser Option sinnvoll sein.<\/p>\n<p>Im nachfolgenden Beispiel wurden 2 Vorg\u00e4nge manuell geplant und deren von Anfangs- und Endtermine festgelegt.<\/p>\n<figure id=\"attachment_2912\" aria-describedby=\"caption-attachment-2912\" style=\"width: 900px\" class=\"wp-caption alignnone\"><a href=\"https:\/\/www.theprojectgroup.com\/blog\/wp-content\/uploads\/2017\/07\/Bild21_PlanungsoptionMSProject-3.png\"><img data-attachment-id=\"2912\"loading=\"lazy\" decoding=\"async\" class=\"wp-image-2912\" src=\"https:\/\/www.theprojectgroup.com\/blog\/wp-content\/uploads\/2017\/07\/Bild21_PlanungsoptionMSProject-3.png\" alt=\"planungsoptionen in MS Project\" width=\"900\" height=\"92\" srcset=\"https:\/\/www.theprojectgroup.com\/blog\/wp-content\/uploads\/2017\/07\/Bild21_PlanungsoptionMSProject-3.png 1060w, https:\/\/www.theprojectgroup.com\/blog\/wp-content\/uploads\/2017\/07\/Bild21_PlanungsoptionMSProject-3-300x31.png 300w, https:\/\/www.theprojectgroup.com\/blog\/wp-content\/uploads\/2017\/07\/Bild21_PlanungsoptionMSProject-3-768x78.png 768w, https:\/\/www.theprojectgroup.com\/blog\/wp-content\/uploads\/2017\/07\/Bild21_PlanungsoptionMSProject-3-1024x104.png 1024w\" sizes=\"(max-width: 900px) 100vw, 900px\" \/><\/a><figcaption id=\"caption-attachment-2912\" class=\"wp-caption-text\">Ausgangssituation f\u00fcr beim Bearbeiten von Links manuell geplanter Vorg\u00e4nge aktualisieren<\/figcaption><\/figure>\n<p>In dem Moment, in dem Sie den Vorgang <em>Task 1<\/em> (Zeile 1) zum Vorg\u00e4nger von <em>Task 2<\/em> (Zeile 2) machen, weil inhaltlich eine Vorg\u00e4nger-Nachfolger-Beziehung vorliegt, verschiebt MS Project den Vorgang um 3 Tage nach hinten. In diesem Fall unterst\u00fctzt das Aktualisieren Sie bei der Planung.<\/p>\n<figure id=\"attachment_2913\" aria-describedby=\"caption-attachment-2913\" style=\"width: 900px\" class=\"wp-caption alignleft\"><a href=\"https:\/\/www.theprojectgroup.com\/blog\/wp-content\/uploads\/2017\/07\/Bild22_PlanungsoptionMSProject-1.png\"><img data-attachment-id=\"2913\"loading=\"lazy\" decoding=\"async\" class=\"wp-image-2913\" src=\"https:\/\/www.theprojectgroup.com\/blog\/wp-content\/uploads\/2017\/07\/Bild22_PlanungsoptionMSProject-1.png\" alt=\"Planungsoption in MSProject\" width=\"900\" height=\"84\" srcset=\"https:\/\/www.theprojectgroup.com\/blog\/wp-content\/uploads\/2017\/07\/Bild22_PlanungsoptionMSProject-1.png 1059w, https:\/\/www.theprojectgroup.com\/blog\/wp-content\/uploads\/2017\/07\/Bild22_PlanungsoptionMSProject-1-300x28.png 300w, https:\/\/www.theprojectgroup.com\/blog\/wp-content\/uploads\/2017\/07\/Bild22_PlanungsoptionMSProject-1-768x72.png 768w, https:\/\/www.theprojectgroup.com\/blog\/wp-content\/uploads\/2017\/07\/Bild22_PlanungsoptionMSProject-1-1024x96.png 1024w\" sizes=\"(max-width: 900px) 100vw, 900px\" \/><\/a><figcaption id=\"caption-attachment-2913\" class=\"wp-caption-text\">Anfangsdatum wird bei Verkn\u00fcpfung neu berechnet<\/figcaption><\/figure>\n<p>&nbsp;<\/p>\n<p>Ist die Option deaktiviert, so wird der Vorgang <em>Task 2<\/em> (Zeile 2) trotz der gesetzten Verkn\u00fcpfung nicht verschoben. MS Project weist Sie jedoch daraufhin, dass der Terminplan so nicht stimmen kann. Das Enddatum vom <em>Task 2<\/em> (Zeile 2) wird rot unterstrichen und im Gantt-Chart wird der obere und untere Rand des Balkens gepunktet dargestellt.<\/p>\n<figure id=\"attachment_2914\" aria-describedby=\"caption-attachment-2914\" style=\"width: 1061px\" class=\"wp-caption alignleft\"><a href=\"https:\/\/www.theprojectgroup.com\/blog\/wp-content\/uploads\/2017\/07\/Bild23_PlanungsoptionMSProject-1.png\"><img data-attachment-id=\"2914\"loading=\"lazy\" decoding=\"async\" class=\"wp-image-2914 size-full\" src=\"https:\/\/www.theprojectgroup.com\/blog\/wp-content\/uploads\/2017\/07\/Bild23_PlanungsoptionMSProject-1.png\" alt=\"Planungsoptionen in MS Project\" width=\"1061\" height=\"105\" srcset=\"https:\/\/www.theprojectgroup.com\/blog\/wp-content\/uploads\/2017\/07\/Bild23_PlanungsoptionMSProject-1.png 1061w, https:\/\/www.theprojectgroup.com\/blog\/wp-content\/uploads\/2017\/07\/Bild23_PlanungsoptionMSProject-1-300x30.png 300w, https:\/\/www.theprojectgroup.com\/blog\/wp-content\/uploads\/2017\/07\/Bild23_PlanungsoptionMSProject-1-768x76.png 768w, https:\/\/www.theprojectgroup.com\/blog\/wp-content\/uploads\/2017\/07\/Bild23_PlanungsoptionMSProject-1-1024x101.png 1024w\" sizes=\"(max-width: 1061px) 100vw, 1061px\" \/><\/a><figcaption id=\"caption-attachment-2914\" class=\"wp-caption-text\">Anfangsdatum wird bei Verkn\u00fcpfung nicht neu berechnet<\/figcaption><\/figure>\n<p>Verwenden Sie haupts\u00e4chlich automatisch geplante Vorg\u00e4nge? Dann wollen Sie vermutlich, dass MS Project bei der Anlage von Vorgangsbeziehungen Anfangs- und Endtermine neu berechnet. Wollen Sie das nicht, dann deaktivieren Sie die Option und arbeiten mit manuell geplanten Vorg\u00e4ngen.<\/p>\n<h2 id=\"Kapitel11\">MS Project Einschr\u00e4nkungstermine<\/h2>\n<p>Auch diese Einstellung (Option: <em>Vorg\u00e4nge beachten stets ihre Einschr\u00e4nkungstermine<\/em>) hat erhebliche Auswirkungen auf Ihren Projektplan.<\/p>\n<p>Ist diese <strong>Option Einschr\u00e4nkungstermine aktiviert<\/strong>, so wird die gesetzte Einschr\u00e4nkung immer beachtet. F\u00fcr den Vorgang <em>Task 2<\/em> (Zeile 2) habe ich \u00fcber den Dialog <em>Informationen zum Vorgang<\/em> eine <em>Vorgangseinschr\u00e4nkung Muss anfangen am<\/em> gesetzt.<\/p>\n<p>Der Anfangstermin wird nicht angepasst, obwohl der Vorg\u00e4nger erst am 21.07.2017 endet. In der Informationsspalte sehen Sie ein Kalendersymbol, dass Sie auf die vorliegende Einschr\u00e4nkung hinweist.<\/p>\n<figure id=\"attachment_2915\" aria-describedby=\"caption-attachment-2915\" style=\"width: 900px\" class=\"wp-caption alignnone\"><a href=\"https:\/\/www.theprojectgroup.com\/blog\/wp-content\/uploads\/2017\/07\/Bild24_PlanungsoptionMSProject-1.png\"><img data-attachment-id=\"2915\"loading=\"lazy\" decoding=\"async\" class=\"wp-image-2915\" src=\"https:\/\/www.theprojectgroup.com\/blog\/wp-content\/uploads\/2017\/07\/Bild24_PlanungsoptionMSProject-1.png\" alt=\"Planungsoptionen in MS Project - Einschr\u00e4nkungstermine\" width=\"900\" height=\"351\" srcset=\"https:\/\/www.theprojectgroup.com\/blog\/wp-content\/uploads\/2017\/07\/Bild24_PlanungsoptionMSProject-1.png 1351w, https:\/\/www.theprojectgroup.com\/blog\/wp-content\/uploads\/2017\/07\/Bild24_PlanungsoptionMSProject-1-300x117.png 300w, https:\/\/www.theprojectgroup.com\/blog\/wp-content\/uploads\/2017\/07\/Bild24_PlanungsoptionMSProject-1-768x300.png 768w, https:\/\/www.theprojectgroup.com\/blog\/wp-content\/uploads\/2017\/07\/Bild24_PlanungsoptionMSProject-1-1024x399.png 1024w\" sizes=\"(max-width: 900px) 100vw, 900px\" \/><\/a><figcaption id=\"caption-attachment-2915\" class=\"wp-caption-text\">Endtermin wird beibehalten bei gesetztem Einschr\u00e4nkungstermin<\/figcaption><\/figure>\n<p>Ist die <strong>Option Einschr\u00e4nkungstermine deaktiviert<\/strong>, so ergibt sich ein vollkommen anders Bild. Der Anfangstermin von <em>Task 2<\/em> (Zeile 2) wird neu berechnet, der Vorgang verschiebt sich nach hinten.<\/p>\n<p>In der Informationsspalte erscheint das Kalendersymbol mit einem Warnsymbol, das Sie darauf aufmerksam macht, dass der berechnete Anfangstermin, 24. Juli, dem Einschr\u00e4nkungstermin f\u00fcr den Anfang, 17. Juli, widerspricht.<\/p>\n<figure id=\"attachment_2903\" aria-describedby=\"caption-attachment-2903\" style=\"width: 900px\" class=\"wp-caption alignnone\"><a href=\"https:\/\/www.theprojectgroup.com\/blog\/wp-content\/uploads\/2017\/07\/Bild26_PlanungsoptionMSProject.png\"><img data-attachment-id=\"2903\"loading=\"lazy\" decoding=\"async\" class=\"wp-image-2903\" src=\"https:\/\/www.theprojectgroup.com\/blog\/wp-content\/uploads\/2017\/07\/Bild26_PlanungsoptionMSProject.png\" alt=\"Planungsoptionen in MS Project - Einschr\u00e4nkung\" width=\"900\" height=\"69\" srcset=\"https:\/\/www.theprojectgroup.com\/blog\/wp-content\/uploads\/2017\/07\/Bild26_PlanungsoptionMSProject.png 1334w, https:\/\/www.theprojectgroup.com\/blog\/wp-content\/uploads\/2017\/07\/Bild26_PlanungsoptionMSProject-300x23.png 300w, https:\/\/www.theprojectgroup.com\/blog\/wp-content\/uploads\/2017\/07\/Bild26_PlanungsoptionMSProject-768x59.png 768w, https:\/\/www.theprojectgroup.com\/blog\/wp-content\/uploads\/2017\/07\/Bild26_PlanungsoptionMSProject-1024x79.png 1024w\" sizes=\"(max-width: 900px) 100vw, 900px\" \/><\/a><figcaption id=\"caption-attachment-2903\" class=\"wp-caption-text\">Endtermin wird neu berechnet trotz gesetzter Einschr\u00e4nkung<\/figcaption><\/figure>\n<p>Da \u00fcblicherweise Einschr\u00e4nkungstermine in der Terminplanung aus guten Grund gesetzt werden und deshalb auch beachtet werden sollen, <strong>empfehle ich die Option Einschr\u00e4nkungstermine immer zu aktivieren.<\/strong><\/p>\n<h2 id=\"Kapitel12\">Gesch\u00e4tzte Dauern<\/h2>\n<p>Das Aktivieren der Optionen <em>Anzeigen, dass Dauern von Vorg\u00e4ngen gesch\u00e4tzt sind<\/em> und <em>Neue geplante Vorg\u00e4nge haben gesch\u00e4tzte Dauer<\/em>\u00a0ist daf\u00fcr verantwortlich, dass bei automatisch geplanten Vorg\u00e4ngen das ber\u00fchmte <strong>Fragezeichen im Feld <em>Dauer<\/em><\/strong> angezeigt wird. Das Fragezeichen wird so lange angezeigt, bis Sie die Dauer eines Vorgangs erstmalig editieren.<\/p>\n<p>Im Falle manuell geplanter Vorg\u00e4nge erscheint das Fragezeichen in der Spalte <em>Vorgangsmodus<\/em>. Das Fragezeichen erscheint nicht mehr, wenn Sie die Dauer des Vorgangs editieren oder einen Anfangs- und einen Endtermin f\u00fcr den Vorgang erfassen.<\/p>\n<figure id=\"attachment_2917\" aria-describedby=\"caption-attachment-2917\" style=\"width: 900px\" class=\"wp-caption alignnone\"><a href=\"https:\/\/www.theprojectgroup.com\/blog\/wp-content\/uploads\/2017\/07\/Bild26_PlanungsoptionMSProject-1.png\"><img data-attachment-id=\"2917\"loading=\"lazy\" decoding=\"async\" class=\"wp-image-2917\" src=\"https:\/\/www.theprojectgroup.com\/blog\/wp-content\/uploads\/2017\/07\/Bild26_PlanungsoptionMSProject-1.png\" alt=\"Planungsoptionen in MS Project - Fragezeichen Dauer\" width=\"900\" height=\"82\" srcset=\"https:\/\/www.theprojectgroup.com\/blog\/wp-content\/uploads\/2017\/07\/Bild26_PlanungsoptionMSProject-1.png 1081w, https:\/\/www.theprojectgroup.com\/blog\/wp-content\/uploads\/2017\/07\/Bild26_PlanungsoptionMSProject-1-300x27.png 300w, https:\/\/www.theprojectgroup.com\/blog\/wp-content\/uploads\/2017\/07\/Bild26_PlanungsoptionMSProject-1-768x70.png 768w, https:\/\/www.theprojectgroup.com\/blog\/wp-content\/uploads\/2017\/07\/Bild26_PlanungsoptionMSProject-1-1024x93.png 1024w, https:\/\/www.theprojectgroup.com\/blog\/wp-content\/uploads\/2017\/07\/Bild26_PlanungsoptionMSProject-1-1078x98.png 1078w\" sizes=\"(max-width: 900px) 100vw, 900px\" \/><\/a><figcaption id=\"caption-attachment-2917\" class=\"wp-caption-text\">Vorg\u00e4nge mit gesch\u00e4tzter Dauer<\/figcaption><\/figure>\n<p>Ob Sie nun die Optionen aktivieren oder deaktivieren ist reine Geschmackssache. Ich pers\u00f6nlich deaktiviere diese beiden Optionen, da Vorgangsdauern in einem Projektplan per se gesch\u00e4tzt sind.<\/p>\n<h2 id=\"Kapitel13\">Vorgang am n\u00e4chstgelegenen Arbeitstag halten<\/h2>\n<p>Diese Option (Option: <em>Beim Wechsel zum automatischen Planungsmodus Vorgang am n\u00e4chstgelegenen Arbeitstag halten<\/em>) wirkt sich immer dann aus, wenn Sie einen Vorgang manuell geplant haben und dessen Anfangs- oder Endtermin auf einen arbeitsfreien Tag gelegt haben.<\/p>\n<p>In der abgebildeten Ausgangssituation beginnt<\/p>\n<ul>\n<li>der Vorgang <em>Task 1<\/em> (Zeile 1) am Sonntag, den 16. Juli.<\/li>\n<li>Der Vorgang <em>Task 2<\/em> (Zeile 2) wurde so geplant, dass er am Sonntag, den 23. Juli, endet.<\/li>\n<li>Die Option <em>Beim Wechsel zum automatischen Planungsmodus Vorgang am n\u00e4chstgelegenen Arbeitstag halten<\/em> ist aktiviert.<\/li>\n<li>Der Projektstarttermin ist der 10. Juli.<\/li>\n<\/ul>\n<figure id=\"attachment_2918\" aria-describedby=\"caption-attachment-2918\" style=\"width: 900px\" class=\"wp-caption alignnone\"><a href=\"https:\/\/www.theprojectgroup.com\/blog\/wp-content\/uploads\/2017\/07\/Bild27_PlanungsoptionMSProject-1.png\"><img data-attachment-id=\"2918\"loading=\"lazy\" decoding=\"async\" class=\"wp-image-2918\" src=\"https:\/\/www.theprojectgroup.com\/blog\/wp-content\/uploads\/2017\/07\/Bild27_PlanungsoptionMSProject-1.png\" alt=\"Planungsoptionen in MS Project\" width=\"900\" height=\"91\" srcset=\"https:\/\/www.theprojectgroup.com\/blog\/wp-content\/uploads\/2017\/07\/Bild27_PlanungsoptionMSProject-1.png 1017w, https:\/\/www.theprojectgroup.com\/blog\/wp-content\/uploads\/2017\/07\/Bild27_PlanungsoptionMSProject-1-300x30.png 300w, https:\/\/www.theprojectgroup.com\/blog\/wp-content\/uploads\/2017\/07\/Bild27_PlanungsoptionMSProject-1-768x78.png 768w\" sizes=\"(max-width: 900px) 100vw, 900px\" \/><\/a><figcaption id=\"caption-attachment-2918\" class=\"wp-caption-text\">Ausgangssituation f\u00fcr den Wechsel von manuell zu automatisch geplant<\/figcaption><\/figure>\n<p>Wenn Sie den Planungsmodus der Vorg\u00e4nge auf <em>automatisch geplant<\/em> \u00e4ndern, so beginnt:<\/p>\n<ul>\n<li><em>Task 1<\/em> jetzt am Montag, den 17. Juli. Das ist der n\u00e4chstgelegene Arbeitstag f\u00fcr den Start des Vorgangs.<\/li>\n<li>Bei<em> Task 2<\/em> verschiebt sich das Ende auf den 24. Juli. Das ist der n\u00e4chstgelegene Arbeitstag f\u00fcr das Ende dieses Vorgangs.<\/li>\n<\/ul>\n<p>Beachten Sie bitte unbedingt, dass in beiden F\u00e4llen eine Vorgangseinschr\u00e4nkung <em>Anfang nicht fr\u00fcher als<\/em> gesetzt wurde.<\/p>\n<figure id=\"attachment_2919\" aria-describedby=\"caption-attachment-2919\" style=\"width: 900px\" class=\"wp-caption alignnone\"><a href=\"https:\/\/www.theprojectgroup.com\/blog\/wp-content\/uploads\/2017\/07\/Bild28_PlanungsoptionMSProject-1.png\"><img data-attachment-id=\"2919\"loading=\"lazy\" decoding=\"async\" class=\"wp-image-2919\" src=\"https:\/\/www.theprojectgroup.com\/blog\/wp-content\/uploads\/2017\/07\/Bild28_PlanungsoptionMSProject-1.png\" alt=\"Planungsoptionen in MS Project\" width=\"900\" height=\"89\" srcset=\"https:\/\/www.theprojectgroup.com\/blog\/wp-content\/uploads\/2017\/07\/Bild28_PlanungsoptionMSProject-1.png 1021w, https:\/\/www.theprojectgroup.com\/blog\/wp-content\/uploads\/2017\/07\/Bild28_PlanungsoptionMSProject-1-300x30.png 300w, https:\/\/www.theprojectgroup.com\/blog\/wp-content\/uploads\/2017\/07\/Bild28_PlanungsoptionMSProject-1-768x76.png 768w\" sizes=\"(max-width: 900px) 100vw, 900px\" \/><\/a><figcaption id=\"caption-attachment-2919\" class=\"wp-caption-text\">Neuer Anfangs- bzw. Endtermin beim Wechsel zu automatisch geplant<\/figcaption><\/figure>\n<p>F\u00fcr den Fall der Deaktivierung der Option w\u00fcrden beim \u00c4ndern des Planungsmodus von <em>manuell<\/em> auf<em> automatisch geplant<\/em> beide Vorg\u00e4nge am 10. Juli, dem Projektstarttermin, beginnen.<\/p>\n<figure id=\"attachment_2920\" aria-describedby=\"caption-attachment-2920\" style=\"width: 1015px\" class=\"wp-caption alignnone\"><a href=\"https:\/\/www.theprojectgroup.com\/blog\/wp-content\/uploads\/2017\/07\/Bild29_PlanungsoptionMSProject-1.png\"><img data-attachment-id=\"2920\"loading=\"lazy\" decoding=\"async\" class=\"size-full wp-image-2920\" src=\"https:\/\/www.theprojectgroup.com\/blog\/wp-content\/uploads\/2017\/07\/Bild29_PlanungsoptionMSProject-1.png\" alt=\"Planungsoptionen in MS Project\" width=\"1015\" height=\"102\" srcset=\"https:\/\/www.theprojectgroup.com\/blog\/wp-content\/uploads\/2017\/07\/Bild29_PlanungsoptionMSProject-1.png 1015w, https:\/\/www.theprojectgroup.com\/blog\/wp-content\/uploads\/2017\/07\/Bild29_PlanungsoptionMSProject-1-300x30.png 300w, https:\/\/www.theprojectgroup.com\/blog\/wp-content\/uploads\/2017\/07\/Bild29_PlanungsoptionMSProject-1-768x77.png 768w\" sizes=\"(max-width: 1015px) 100vw, 1015px\" \/><\/a><figcaption id=\"caption-attachment-2920\" class=\"wp-caption-text\">Projektstarttermin beim Wechsel zu automatisch geplant<\/figcaption><\/figure>\n<h2 id=\"Kapitel14\">Zusammenfassung<\/h2>\n<p>Wie Sie anhand von Beispielen und Empfehlungen gelernt haben, spielen die vielen Planungsoptionen in MS Project eine mehr oder weniger wichtige Rolle f\u00fcr Ihre Planung. Beachten Sie beim Umgang mit den Optionen folgende Punkte:<\/p>\n<ol>\n<li>Die eingestellten Werte bei den Planungsoptionen bestimmen f\u00fcr jedes Projekt das prinzipielle Verhalten und die Berechnungsergebnisse (Grundeinstellungen).<\/li>\n<li>Wenn n\u00f6tig, k\u00f6nnen Sie Einstellungen jederzeit direkt in den Optionen \u00e4ndern oder eine abweichende Einstellung f\u00fcr Vorg\u00e4nge vornehmen.<\/li>\n<li>Wenn Sie die Berechnungsergebnisse und das Verhalten von MS Project in Ihrem Projekt nachzuvollziehen m\u00f6chten, dann sollten Sie wissen, welche Planungsoptionen hierf\u00fcr eingestellt sind.<\/li>\n<\/ol>\n\n    <p class=\"datamintsbanner\">\n        <a href=\"https:\/\/bit.ly\/3IWzlQw\" target=\"_blank\" class=\"datamintsbanner__link\" title=\"TPG ProjectPowerPack Microsoft 365 Projektmanagement\" style=\"display: block;\">\n            <img data-attachment-id=\"0\"decoding=\"async\" src=\"https:\/\/www.theprojectgroup.com\/blog\/wp-content\/uploads\/2025\/04\/PPP_Blog_Banner_3_1300px-AS_tiny.jpg\" class=\"datamintsbanner__image\" style=\"display: block; max-width: 100%\">\n        <\/a>\n    <\/p>\n    \n<h3 id=\"Reihe\">Die Blogreihe \u201eReine Einstellungssache \u2013 Optionen in MS Project\u201c<\/h3>\n<ul>\n<li>Teil 1: <a href=\"https:\/\/www.theprojectgroup.com\/blog\/ms-project-kalender-optionen\/\" target=\"_blank\" rel=\"noopener\">MS Project Kalender Optionen<\/a><\/li>\n<li>Teil 2: <a href=\"https:\/\/www.theprojectgroup.com\/blog\/ms-project-planungsoptionen\/\">MS Project Planungsoptionen<\/a><\/li>\n<li>Teil 3: <a href=\"https:\/\/www.theprojectgroup.com\/blog\/ms-project-kritischer-pfad\/\">MS Project Kritischer Pfad Optionen<\/a><\/li>\n<li>Teil 4: <a href=\"https:\/\/www.theprojectgroup.com\/blog\/basisplan-optionen-in-ms-project\">MS Project Basisplan Optionen<\/a><\/li>\n<\/ul>\n<div>\n<blockquote><p><strong>Unsere Tipps zum Schluss: <\/strong>Lernen Sie das individuell anpassbare \u201cThe PPM Paradise\u201d kennen \u2013 <span dir=\"ltr\" role=\"presentation\">die optimale Umgebung f\u00fcr ein unternehmensweites Projekt-, Programm-, Portfolio- und Ressourcenmanagement (PPM). Laden Sie sich jetzt <\/span><a href=\"https:\/\/www.theprojectgroup.com\/data\/Downloads_eBooks\/TPG_PPM_Paradise_eBook_-_TPG_TheProjectGroup.pdf\" target=\"_blank\" rel=\"noopener\"><span dir=\"ltr\" role=\"presentation\">hier das eBook dazu herunter<\/span><\/a><span dir=\"ltr\" role=\"presentation\"> (nur klicken, ohne Formular).<\/span><\/p>\n<p><span dir=\"ltr\" role=\"presentation\">Und abonnieren Sie unseren <\/span><a href=\"https:\/\/www.theprojectgroup.com\/de\/projektmanagement-newsletter\" target=\"_blank\" rel=\"noopener\"><span dir=\"ltr\" role=\"presentation\">Projektmanagement Newsletter<\/span><\/a> mit mehr MS Project Tipps, praxisstarken Artikeln, Webinaren, Podcasts, eBooks etc. f\u00fcr ein h\u00f6heres Reifengrad-Level Ihres Projektmanagements!<\/p><\/blockquote>\n<p>Sie wollen das Gelernte vertiefen, weitere wichtige Tipps erfahren und Ihre Fragen stellen? Dann sind Sie genau richtig beim TPG <a href=\"https:\/\/www.theprojectgroup.com\/de\/ms-project-seminar-einsteiger-schulung\" target=\"_blank\" rel=\"noopener\">Microsoft Project Seminar (Grundlagen)<\/a>.<\/p>\n<p><strong>Haben Sie noch Fragen? Dann hinterlassen Sie einen Kommentar, auf den wir in K\u00fcrze antworten werden \u2013 garantiert<\/strong><\/p>\n<span style='display:none;'>FALSE<\/span><blockquote><p><a href=\"https:\/\/www.theprojectgroup.com\/blog\/wp-content\/uploads\/2023\/06\/MartinGbunt.jpg\"><img data-attachment-id=\"10893\"loading=\"lazy\" decoding=\"async\" class=\"wp-image-10893 size-thumbnail alignleft\" src=\"https:\/\/www.theprojectgroup.com\/blog\/wp-content\/uploads\/2023\/06\/MartinGbunt-150x150.jpg\" alt=\"Martin G\u00f6sse\" width=\"150\" height=\"150\" srcset=\"https:\/\/www.theprojectgroup.com\/blog\/wp-content\/uploads\/2023\/06\/MartinGbunt-150x150.jpg 150w, https:\/\/www.theprojectgroup.com\/blog\/wp-content\/uploads\/2023\/06\/MartinGbunt.jpg 200w\" sizes=\"(max-width: 150px) 100vw, 150px\" \/><\/a><strong>Der Autor:<br \/>\nMartin G\u00f6sse, PMP<\/strong><strong><br \/>\n<\/strong><\/p>\n<p>Martin G\u00f6sse, PMP, verf\u00fcgt \u00fcber mehr als 20 Jahre Erfahrung im Trainingsbereich, die er in namhaften Gro\u00dfunternehmen sammeln konnte. Neben seiner T\u00e4tigkeit als Trainer f\u00fcr die offene MS Project Schulung arbeitet Martin G\u00f6sse auch als TPG Consultant f\u00fcr Microsoft und Planisware Project &amp; Portfolio Management L\u00f6sungen und Trainings. Seine praktischen Erfahrungen als Trainer, Projektleiter und Consultant sowie seine Kenntnisse vieler Branchen sind das Fundament seiner Seminare. Mehr \u00fcber Martin G\u00f6sse auf <a href=\"https:\/\/www.xing.com\/profile\/Martin_Goesse\/cv\" target=\"_blank\" rel=\"noopener\">Xing<\/a>.<\/p><\/blockquote>\n\n    <p class=\"datamintsbanner\">\n        <a href=\"https:\/\/bit.ly\/3udKM2C\" target=\"_blank\" class=\"datamintsbanner__link\" title=\"Job TPG Bewerbung Wirsuchendich TPG TheProjectGroup Consultant Microsoft PPM Jobs\" style=\"display: block;\">\n            <img data-attachment-id=\"0\"decoding=\"async\" src=\"https:\/\/www.theprojectgroup.com\/blog\/wp-content\/uploads\/2022\/10\/Jobs-3.jpg\" class=\"datamintsbanner__image\" style=\"display: block; max-width: 100%\">\n        <\/a>\n    <\/p>\n    \n<\/div>\n","protected":false},"excerpt":{"rendered":"<p>Dies ist der zweite Teil der Blog-Reihe \u201eReine Einstellungssache \u2013 die Optionen in MS Project\u201c. In diesem geht es um die Frage, wie sich die vielen verschiedenen MS Project Planungsoptionen auf das Verhalten des Tools auswirken. Sie lernen mit praktischen Tipps, was Sie beachten sollten und welche Optionseinstellungen Sie f\u00fcr Ihre Projektplanung wann nutzen sollten.<\/p>\n<div class=\"read-more\"><a href=\"https:\/\/www.theprojectgroup.com\/blog\/ms-project-planungsoptionen\/\" title=\"Weiterlesen\">Weiterlesen<\/a><\/div>\n","protected":false},"author":19,"featured_media":9241,"comment_status":"open","ping_status":"open","sticky":false,"template":"","format":"standard","meta":{"footnotes":""},"categories":[24],"tags":[],"_links":{"self":[{"href":"https:\/\/www.theprojectgroup.com\/blog\/wp-json\/wp\/v2\/posts\/2877"}],"collection":[{"href":"https:\/\/www.theprojectgroup.com\/blog\/wp-json\/wp\/v2\/posts"}],"about":[{"href":"https:\/\/www.theprojectgroup.com\/blog\/wp-json\/wp\/v2\/types\/post"}],"author":[{"embeddable":true,"href":"https:\/\/www.theprojectgroup.com\/blog\/wp-json\/wp\/v2\/users\/19"}],"replies":[{"embeddable":true,"href":"https:\/\/www.theprojectgroup.com\/blog\/wp-json\/wp\/v2\/comments?post=2877"}],"version-history":[{"count":34,"href":"https:\/\/www.theprojectgroup.com\/blog\/wp-json\/wp\/v2\/posts\/2877\/revisions"}],"predecessor-version":[{"id":12531,"href":"https:\/\/www.theprojectgroup.com\/blog\/wp-json\/wp\/v2\/posts\/2877\/revisions\/12531"}],"wp:featuredmedia":[{"embeddable":true,"href":"https:\/\/www.theprojectgroup.com\/blog\/wp-json\/wp\/v2\/media\/9241"}],"wp:attachment":[{"href":"https:\/\/www.theprojectgroup.com\/blog\/wp-json\/wp\/v2\/media?parent=2877"}],"wp:term":[{"taxonomy":"category","embeddable":true,"href":"https:\/\/www.theprojectgroup.com\/blog\/wp-json\/wp\/v2\/categories?post=2877"},{"taxonomy":"post_tag","embeddable":true,"href":"https:\/\/www.theprojectgroup.com\/blog\/wp-json\/wp\/v2\/tags?post=2877"}],"curies":[{"name":"wp","href":"https:\/\/api.w.org\/{rel}","templated":true}]}}