<img loading='lazy' style='display: none;' data-attachment-id-target='2143' src='https://www.theprojectgroup.com/blog/wp-content/uploads/2016/11/FPA_01.png'><img loading='lazy' style='display: none;' data-attachment-id-target='2144' src='https://www.theprojectgroup.com/blog/wp-content/uploads/2016/11/FPA_02.png'><img loading='lazy' style='display: none;' data-attachment-id-target='2156' src='https://www.theprojectgroup.com/blog/wp-content/uploads/2016/11/Tabelle2.png'><img loading='lazy' style='display: none;' data-attachment-id-target='2145' src='https://www.theprojectgroup.com/blog/wp-content/uploads/2016/11/FPA_03.png'><img loading='lazy' style='display: none;' data-attachment-id-target='2146' src='https://www.theprojectgroup.com/blog/wp-content/uploads/2016/11/FPA_04.png'><img loading='lazy' style='display: none;' data-attachment-id-target='0' src=''><img loading='lazy' style='display: none;' data-attachment-id-target='2147' src='https://www.theprojectgroup.com/blog/wp-content/uploads/2016/11/FPA_05.png'><img loading='lazy' style='display: none;' data-attachment-id-target='2148' src='https://www.theprojectgroup.com/blog/wp-content/uploads/2016/11/FPA_06.png'><img loading='lazy' style='display: none;' data-attachment-id-target='2157' src='https://www.theprojectgroup.com/blog/wp-content/uploads/2016/11/Tabelle3.png'><img loading='lazy' style='display: none;' data-attachment-id-target='0' src=''><img loading='lazy' style='display: none;' data-attachment-id-target='2149' src='https://www.theprojectgroup.com/blog/wp-content/uploads/2016/11/FPA_07.png'><img loading='lazy' style='display: none;' data-attachment-id-target='2150' src='https://www.theprojectgroup.com/blog/wp-content/uploads/2016/11/FPA_08.png'><img loading='lazy' style='display: none;' data-attachment-id-target='2151' src='https://www.theprojectgroup.com/blog/wp-content/uploads/2016/11/FPA_09.png'><img loading='lazy' style='display: none;' data-attachment-id-target='2152' src='https://www.theprojectgroup.com/blog/wp-content/uploads/2016/11/FPA_10.png'><img loading='lazy' style='display: none;' data-attachment-id-target='2153' src='https://www.theprojectgroup.com/blog/wp-content/uploads/2016/11/FPA_11.png'><img loading='lazy' style='display: none;' data-attachment-id-target='2154' src='https://www.theprojectgroup.com/blog/wp-content/uploads/2016/11/FPA_12.png'><img loading='lazy' style='display: none;' data-attachment-id-target='0' src=''><img loading='lazy' style='display: none;' data-attachment-id-target='6147' src='https://www.theprojectgroup.com/blog/wp-content/uploads/2020/03/Kathryn_Dixon_300x300px.jpg'><img loading='lazy' style='display: none;' data-attachment-id-target='0' src=''>{"id":2138,"date":"2023-06-22T13:00:21","date_gmt":"2023-06-22T11:00:21","guid":{"rendered":"https:\/\/www.theprojectgroup.com\/blog\/?p=2138"},"modified":"2024-07-03T16:08:27","modified_gmt":"2024-07-03T14:08:27","slug":"ms-project-fortschritt-anzeigen","status":"publish","type":"post","link":"https:\/\/www.theprojectgroup.com\/blog\/ms-project-fortschritt-anzeigen\/","title":{"rendered":"Fortschritt anzeigen in MS Project \u2013 farbige Balken f\u00fcr bessere \u00dcbersicht"},"content":{"rendered":"<p>W\u00fcnschen Sie sich eine schnelle \u00dcbersicht zum Stand des Fortschritts der Vorg\u00e4nge in Ihrem Projektplan? Dann ist dieser Tipp zum Thema <strong>MS Project Fortschritt anzeigen<\/strong> genau richtig f\u00fcr Sie.<\/p>\n<p>Microsoft Project bietet seit Version 2010 die M\u00f6glichkeit, den Fortschritt einzelner Vorg\u00e4nge mit einem Kniff grafisch zu visualisieren. Sie k\u00f6nnen also die Vorgangsbalken in Abh\u00e4ngigkeit vom Fortschritt farblich kennzeichnen. Und damit verbessern Sie die \u00dcbersicht.<\/p>\n<p>Wie das geht, den Kniff erfahren Sie in diesen Kapiteln:<\/p>\n<ul>\n<li><a href=\"#Kapitel1\">Ziel und Vorteil von \u201eFortschritt anzeigen\u201c<\/a><\/li>\n<li><a href=\"#Kapitel2\">
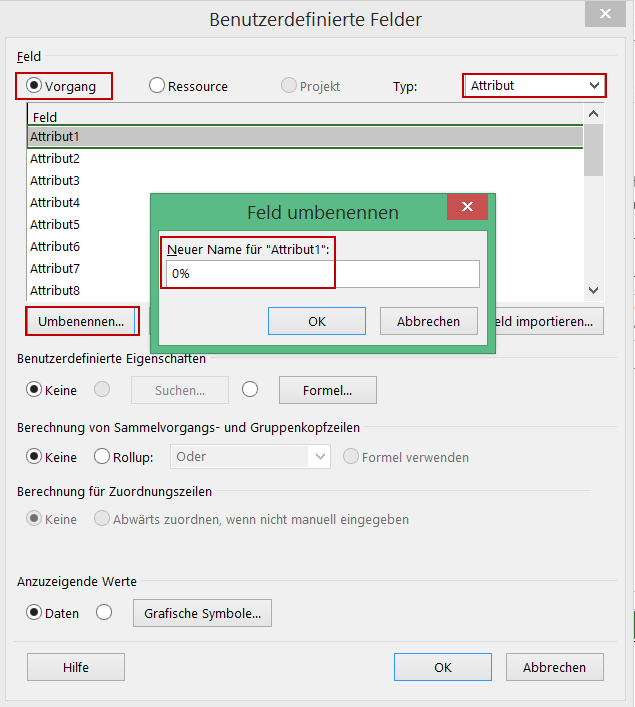
Schritt 1: Vorgangsattribute definieren<\/a><\/li>\n<li><a href=\"#Kapitel3\">
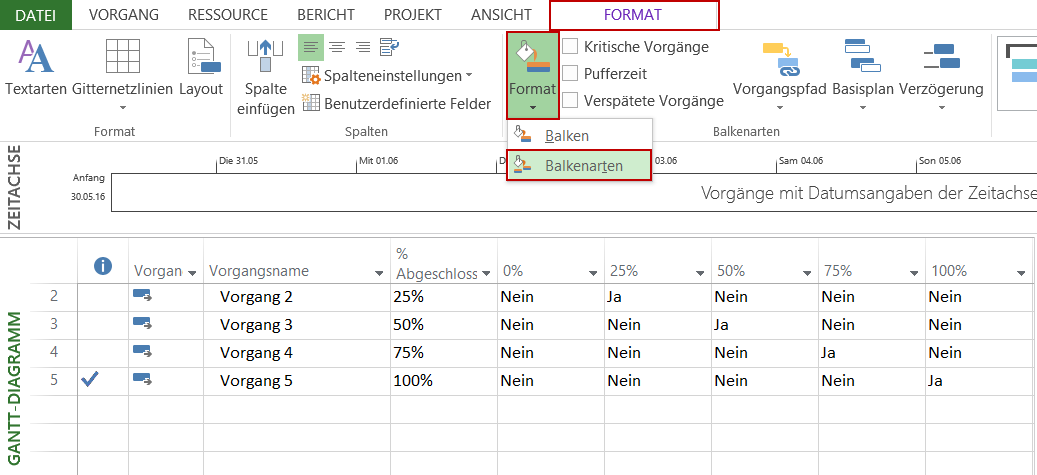
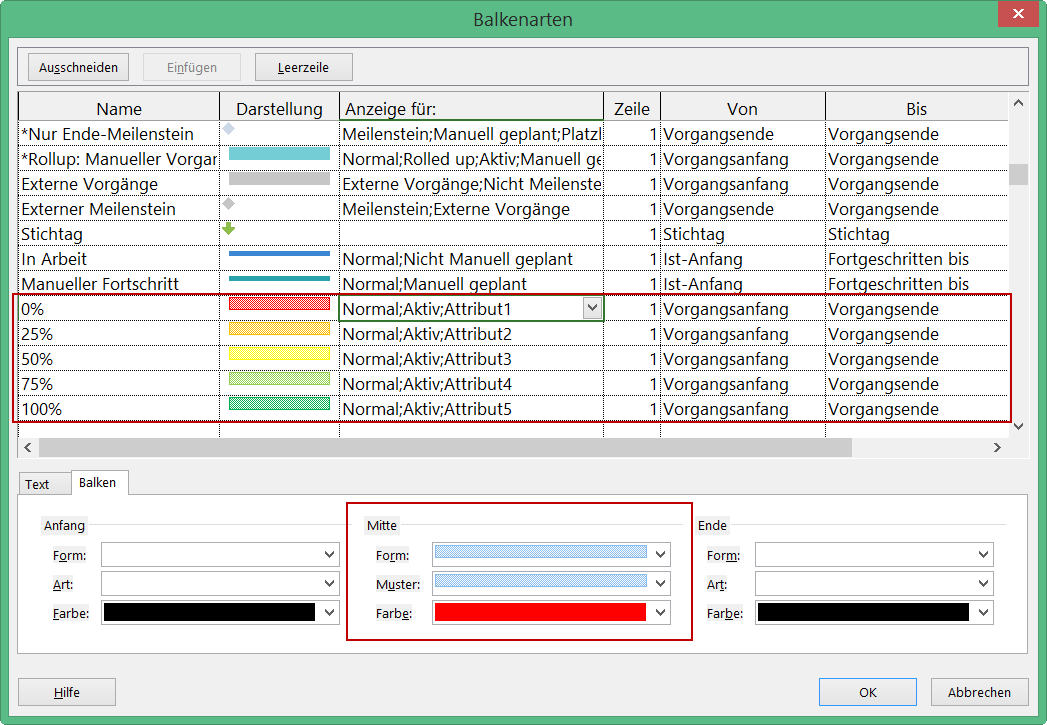
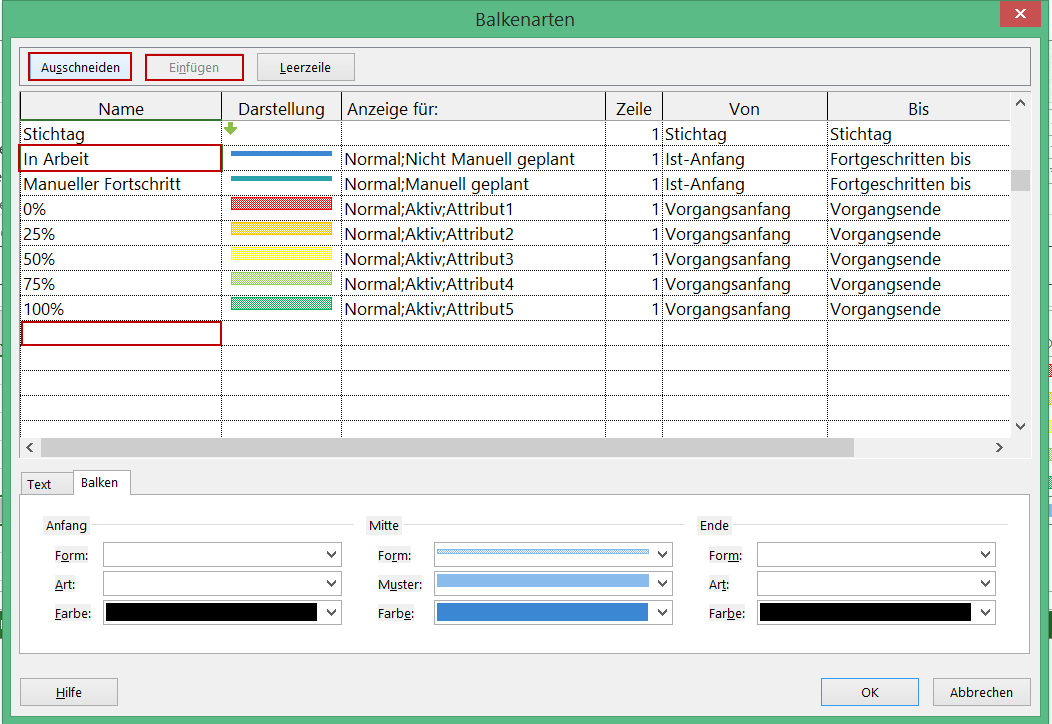
Schritt 2: Balken formatieren<\/a><\/li>\n<li><a href=\"#Kapitel4\">Zusammenfassung<\/a><\/li>\n<\/ul>\n<h2 id=\"Kapitel1\">Ziel und Vorteil von \u201eFortschritt anzeigen\u201c<\/h2>\n<p><strong>Das Ziel:<\/strong> Nach dem Lesen dieses Tipps sind Sie in der Lage:<\/p>\n<ul>\n<li>
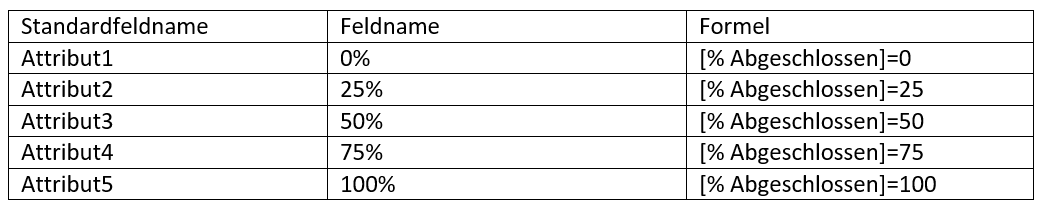
Ihre Vorg\u00e4nge mit den Vorgabewerten aus dem Men\u00fcband zu <em>% erledigt<\/em> mit Werten von 0%, 25%, 50%, 75% und 100% zu bewerten,<\/li>\n<li>die Vorgangsbalken im Gantt-Diagramm entsprechend farblich zu kennzeichnen und<\/li>\n<li>den Fortschrittsgrad im Balken weiterhin zu erkennen<\/li>\n<\/ul>\n<p>Letztlich erreichen Sie eine <strong>Darstellung des Fortschritts \u00fcber die Balkenfarbe<\/strong>, was z.B. so aussehen k\u00f6nnte:<\/p>\n<figure id=\"attachment_2143\" aria-describedby=\"caption-attachment-2143\" style=\"width: 1065px\" class=\"wp-caption alignnone\"><a href=\"https:\/\/www.theprojectgroup.com\/blog\/wp-content\/uploads\/2016\/11\/FPA_01.png\"><img data-attachment-id=\"2143\"loading=\"lazy\" decoding=\"async\" class=\"wp-image-2143 size-full\" src=\"https:\/\/www.theprojectgroup.com\/blog\/wp-content\/uploads\/2016\/11\/FPA_01.png\" alt=\"ms project fortschritt anzeigen\" width=\"1065\" height=\"168\" srcset=\"https:\/\/www.theprojectgroup.com\/blog\/wp-content\/uploads\/2016\/11\/FPA_01.png 1065w, https:\/\/www.theprojectgroup.com\/blog\/wp-content\/uploads\/2016\/11\/FPA_01-300x47.png 300w, https:\/\/www.theprojectgroup.com\/blog\/wp-content\/uploads\/2016\/11\/FPA_01-768x121.png 768w, https:\/\/www.theprojectgroup.com\/blog\/wp-content\/uploads\/2016\/11\/FPA_01-1024x162.png 1024w\" sizes=\"(max-width: 1065px) 100vw, 1065px\" \/><\/a><figcaption id=\"caption-attachment-2143\" class=\"wp-caption-text\">Bild 1: Schaltfl\u00e4chen % erledigt<\/figcaption><\/figure>\n<figure id=\"attachment_2144\" aria-describedby=\"caption-attachment-2144\" style=\"width: 1355px\" class=\"wp-caption alignnone\"><a href=\"https:\/\/www.theprojectgroup.com\/blog\/wp-content\/uploads\/2016\/11\/FPA_02.png\"><img data-attachment-id=\"2144\"loading=\"lazy\" decoding=\"async\" class=\"wp-image-2144 size-full\" src=\"https:\/\/www.theprojectgroup.com\/blog\/wp-content\/uploads\/2016\/11\/FPA_02.png\" alt=\"Fortschritts \u00fcber die Balkenfarbe - MS Project Fortschritt anzeigen\" width=\"1355\" height=\"240\" srcset=\"https:\/\/www.theprojectgroup.com\/blog\/wp-content\/uploads\/2016\/11\/FPA_02.png 1355w, https:\/\/www.theprojectgroup.com\/blog\/wp-content\/uploads\/2016\/11\/FPA_02-300x53.png 300w, https:\/\/www.theprojectgroup.com\/blog\/wp-content\/uploads\/2016\/11\/FPA_02-768x136.png 768w, https:\/\/www.theprojectgroup.com\/blog\/wp-content\/uploads\/2016\/11\/FPA_02-1024x181.png 1024w\" sizes=\"(max-width: 1355px) 100vw, 1355px\" \/><\/a><figcaption id=\"caption-attachment-2144\" class=\"wp-caption-text\">Bild 1: Darstellung des Fortschritts \u00fcber die Balkenfarbe<\/figcaption><\/figure>\n<p><strong>Der Vorteil:<\/strong> Wenn Sie die Fortschrittsbalken anzeigen und die Vorg\u00e4nge farblich gestalten, dann haben Sie einen besseren \u00dcberblick \u00fcber den Fortschritt Ihrer Projekte. Das minimiert Ihren Zeitaufwand bei der Kontrolle.<\/p>\n<div id=\"id69573f6078826\" class=\"iframecontainer iframecontainer--hidden\">\n            <div class=\"iframecontainer__head\" style=\"background: #D60B52!important;\">\n                <div class=\"iframecontainer__head__inner\" style=\"color:#ffffff;\" data-for=\"#id69573f6078826\">\n                    <p><strong>Download (PDF):<\/strong> 11 Schritte zum optimalen MS Project Projektplan (Tutorial)<\/p>\n                <\/div>\n                <div class=\"iframecontainer__head__icon\" data-for=\"#id69573f6078826\">\n                    <svg width=\"10px\" height=\"16px\" viewBox=\"1092 550 10 16\" version=\"1.1\" xmlns=\"http:\/\/www.w3.org\/2000\/svg\" xmlns:xlink=\"http:\/\/www.w3.org\/1999\/xlink\">\n                        <polygon class=\"iframecontainer__head__icon__pfeil\"  data-for=\"#id69573f6078826\" stroke=\"none\" fill=\"#ffffff\" fill-rule=\"evenodd\" points=\"1093.875 550 1101.875 558 1093.875 566 1092 564.125 1098.125 558 1092 551.875\"><\/polygon>\n                    <\/svg>\n                <\/div>\n            <\/div>\n            <div class=\"iframecontainer__iframe\">\n                <div class=\"iframecontainer__iframe__inner\">\n                    <p>Vermeiden Sie mit diesem Tutorial von Beginn an typische Stolperfallen, \u00fcber die Neulinge in MS Project sich gerne den Kopf zerbrechen, unsicher werden und Zeit verschwendet. Das wird Ihnen nicht passieren!<\/p>\n<p><span style=\"font-size: xx-small;\">* Pflichtfeld\u00a0 |\u00a0 <a href=\"https:\/\/www.theprojectgroup.com\/de\/datenschutz\/\" target=\"_blank\" rel=\"noopener\">Datenschutzhinweise<\/a><\/span><\/p>\n<div class=\"cookieconsent-optout-marketing\">Dieses Formular wird durch Ihre Cookie-Einstellung zu unserer Website blockiert. Bitte <a>klicken Sie hier<\/a> und w\u00e4hlen Sie mindestens die Marketing-Cookies aus. Dann wird dieses Formular angezeigt. Vielen Dank.<\/div>\n\n                \t<!-- DEUTSCH: Wichtig: nur den Code in data-download-asset \u00e4ndern - definiert Download -->\r\n<script type='text\/x-ccm-loader' data-ccm-loader-src=\"https:\/\/js-eu1.hsforms.net\/forms\/embed\/developer\/146642994.js\" defer><\/script>\r\n\r\n<div class=\"hs-form-html\"\r\n     data-download-asset=\"CU9D\"\r\n     data-region=\"eu1\"\r\n     data-form-id=\"32ae4d32-4e61-47ed-90d3-c7a25b28719d\"\r\n     data-portal-id=\"146642994\"><\/div>\r\n\r\n<script>\r\n(() => {\r\n  const FORM_ID = '32ae4d32-4e61-47ed-90d3-c7a25b28719d';\r\n  const FIELD   = '0-1\/download_asset';\r\n  const roots   = new Set();\r\n  const formsByRoot = new WeakMap();\r\n\r\n  const setViaApi = (root) => {\r\n    const code = root.dataset.downloadAsset || '';\r\n    const form = formsByRoot.get(root);\r\n    if (!code || !form) return;\r\n    form.setFieldValue(FIELD, code);\r\n  };\r\n\r\n  \/\/ 1) Wenn das Formular ready ist: Form-Instanz holen + Wert via API setzen\r\n  window.addEventListener('hs-form-event:on-ready', (event) => {\r\n    if (!window.HubSpotFormsV4) return;\r\n    const form = HubSpotFormsV4.getFormFromEvent(event);\r\n    if (!form || form.getFormId() !== FORM_ID) return;\r\n\r\n    const root = [...roots].find(r => r.contains(event.target));\r\n    if (!root) return;\r\n\r\n    formsByRoot.set(root, form);\r\n    setViaApi(root);\r\n  });\r\n\r\n  \/\/ 2) Kurz vor dem Absenden nochmal setzen (globaler Callback)\r\n  window.addEventListener('message', (event) => {\r\n    const d = event.data;\r\n    if (!d || d.type !== 'hsFormCallback' || d.eventName !== 'onFormSubmit') return;\r\n    if (d.id !== FORM_ID) return;\r\n\r\n    roots.forEach(setViaApi);\r\n  });\r\n\r\n  \/\/ Boot\r\n  document.addEventListener('DOMContentLoaded', () => {\r\n    document.querySelectorAll('.hs-form-html[data-download-asset][data-form-id=\"' + FORM_ID + '\"]')\r\n      .forEach(r => roots.add(r));\r\n  });\r\n})();\r\n<\/script>\n                    <style>\/* Kompaktere Darstellung f\u00fcr HubSpot Formulare *\/\n[data-hsfc-id=\"Renderer\"] .hsfc-Step .hsfc-Step__Content { padding: 0 20px 20px !important; }\n[data-hsfc-id=Renderer] .hsfc-TextField>*:not(:last-child) { margin-bottom:4px !important; }\n[data-hsfc-id=\"Renderer\"] .hsfc-Row { gap: 20px !important; margin-bottom: 12px !important; }\n[data-hsfc-id=\"Renderer\"] .hsfc-NavigationRow { margin-top: 6px !important; }\n[data-hsfc-id=\"Renderer\"] .hsfc-TextInput { padding: 8px !important; }<\/style>\n                <\/div>\n            <\/div>\n        <\/div><h2 id=\"Kapitel2\">Schritt 1: Vorgangsattribute definieren<\/h2>\n<p>Im Rahmen der MS Project Tipp-Reihe\u00a0\u00a0<a href=\"https:\/\/www.theprojectgroup.com\/blog\/ms-project-neue-spalte-hinzufuegen\/#Serie\">\u201eBenutzerdefinierte Ansichten\u201c<\/a> haben Sie bereits gelernt, wie Sie in\u00a0<a href=\"https:\/\/www.theprojectgroup.com\/blog\/vorgangsattribute-definieren-in-ms-project\/\"> MS Project Vorgangsattribute definieren<\/a>.<\/p>\n<p>Das Wissen k\u00f6nnen Sie jetzt gleich anwenden: F\u00fcr unser Beispiel hier ben\u00f6tigen Sie f\u00fcnf Attributfelder \u2013 eines f\u00fcr jede Auswahlm\u00f6glichkeit zum Fortschritt des Vorgangs.<\/p>\n<figure id=\"attachment_2156\" aria-describedby=\"caption-attachment-2156\" style=\"width: 1047px\" class=\"wp-caption alignnone\"><a href=\"https:\/\/www.theprojectgroup.com\/blog\/wp-content\/uploads\/2016\/11\/Tabelle2.png\"><img data-attachment-id=\"2156\"loading=\"lazy\" decoding=\"async\" class=\"wp-image-2156 size-full\" src=\"https:\/\/www.theprojectgroup.com\/blog\/wp-content\/uploads\/2016\/11\/Tabelle2.png\" alt=\"Tabelle Feldbezeichnungen - MS Project Fortschritt anzeigen\" width=\"1047\" height=\"217\" srcset=\"https:\/\/www.theprojectgroup.com\/blog\/wp-content\/uploads\/2016\/11\/Tabelle2.png 1047w, https:\/\/www.theprojectgroup.com\/blog\/wp-content\/uploads\/2016\/11\/Tabelle2-300x62.png 300w, https:\/\/www.theprojectgroup.com\/blog\/wp-content\/uploads\/2016\/11\/Tabelle2-768x159.png 768w, https:\/\/www.theprojectgroup.com\/blog\/wp-content\/uploads\/2016\/11\/Tabelle2-1024x212.png 1024w\" sizes=\"(max-width: 1047px) 100vw, 1047px\" \/><\/a><figcaption id=\"caption-attachment-2156\" class=\"wp-caption-text\">Bild 2: Tabelle mit den Feldbezeichnungen<\/figcaption><\/figure>\n<p>\u00d6ffnen Sie \u00fcber <em>Projekt<\/em> <em>\u2013 Benutzerdefinierte Felder<\/em> das Dialogfenster <em>Benutzerdefinierte Felder.<\/em><\/p>\n<p>W\u00e4hlen Sie als Typ den Wert <em>Attribut<\/em> und benennen Sie ein Attributfeld gem\u00e4\u00df obiger Tabelle um.<\/p>\n<figure id=\"attachment_2145\" aria-describedby=\"caption-attachment-2145\" style=\"width: 635px\" class=\"wp-caption alignnone\"><a href=\"https:\/\/www.theprojectgroup.com\/blog\/wp-content\/uploads\/2016\/11\/FPA_03.png\"><img data-attachment-id=\"2145\"loading=\"lazy\" decoding=\"async\" class=\"wp-image-2145 size-full\" src=\"https:\/\/www.theprojectgroup.com\/blog\/wp-content\/uploads\/2016\/11\/FPA_03.png\" alt=\"Attributfeld umbenennen - MS Project Fortschritt anzeigen\" width=\"635\" height=\"707\" srcset=\"https:\/\/www.theprojectgroup.com\/blog\/wp-content\/uploads\/2016\/11\/FPA_03.png 635w, https:\/\/www.theprojectgroup.com\/blog\/wp-content\/uploads\/2016\/11\/FPA_03-269x300.png 269w\" sizes=\"(max-width: 635px) 100vw, 635px\" \/><\/a><figcaption id=\"caption-attachment-2145\" class=\"wp-caption-text\">Bild 3: Attributfeld umbenennen<\/figcaption><\/figure>\n<p>Klicken Sie anschlie\u00dfend auf die Schaltfl\u00e4che <em>Formel<\/em>\u00a0und \u00fcbernehmen Sie die passende Formel aus der Tabelle oben.<\/p>\n<figure id=\"attachment_2146\" aria-describedby=\"caption-attachment-2146\" style=\"width: 634px\" class=\"wp-caption alignnone\"><a href=\"https:\/\/www.theprojectgroup.com\/blog\/wp-content\/uploads\/2016\/11\/FPA_04.png\"><img data-attachment-id=\"2146\"loading=\"lazy\" decoding=\"async\" class=\"wp-image-2146 size-full\" src=\"https:\/\/www.theprojectgroup.com\/blog\/wp-content\/uploads\/2016\/11\/FPA_04.png\" alt=\" Formel eingeben - MS Project Fortschritt anzeigen\" width=\"634\" height=\"771\" srcset=\"https:\/\/www.theprojectgroup.com\/blog\/wp-content\/uploads\/2016\/11\/FPA_04.png 634w, https:\/\/www.theprojectgroup.com\/blog\/wp-content\/uploads\/2016\/11\/FPA_04-247x300.png 247w\" sizes=\"(max-width: 634px) 100vw, 634px\" \/><\/a><figcaption id=\"caption-attachment-2146\" class=\"wp-caption-text\">Bild 4: Formel eingeben<\/figcaption><\/figure>\n\n    <p class=\"datamintsbanner\">\n        <a href=\"\" target=\"_blank\" class=\"datamintsbanner__link\" title=\"Motorworld Event (TPG Webinar)\" style=\"display: block;\">\n            <img data-attachment-id=\"0\"decoding=\"async\" src=\"\" class=\"datamintsbanner__image\" style=\"display: block; max-width: 100%\">\n        <\/a>\n    <\/p>\n    \n<p>Wiederholen Sie den Vorgang f\u00fcr die \u00fcbrigen vier Felder.<\/p>\n<figure id=\"attachment_2147\" aria-describedby=\"caption-attachment-2147\" style=\"width: 633px\" class=\"wp-caption alignnone\"><a href=\"https:\/\/www.theprojectgroup.com\/blog\/wp-content\/uploads\/2016\/11\/FPA_05.png\"><img data-attachment-id=\"2147\"loading=\"lazy\" decoding=\"async\" class=\"wp-image-2147 size-full\" src=\"https:\/\/www.theprojectgroup.com\/blog\/wp-content\/uploads\/2016\/11\/FPA_05.png\" alt=\"Vorgangsattribute eingeben - MS Project Fortschritt anzeigen\" width=\"633\" height=\"710\" srcset=\"https:\/\/www.theprojectgroup.com\/blog\/wp-content\/uploads\/2016\/11\/FPA_05.png 633w, https:\/\/www.theprojectgroup.com\/blog\/wp-content\/uploads\/2016\/11\/FPA_05-267x300.png 267w\" sizes=\"(max-width: 633px) 100vw, 633px\" \/><\/a><figcaption id=\"caption-attachment-2147\" class=\"wp-caption-text\">Bild 5: Neu angelegte Vorgangsattribute f\u00fcr alle 5 Fortschrittsgrade<\/figcaption><\/figure>\n<p>Damit ergeben sich f\u00fcr die 5 Fortschrittsgrade aus dem Men\u00fcband folgende Werte f\u00fcr die konfigurierten Attribute.<\/p>\n<figure id=\"attachment_2148\" aria-describedby=\"caption-attachment-2148\" style=\"width: 1033px\" class=\"wp-caption alignnone\"><a href=\"https:\/\/www.theprojectgroup.com\/blog\/wp-content\/uploads\/2016\/11\/FPA_06.png\"><img data-attachment-id=\"2148\"loading=\"lazy\" decoding=\"async\" class=\"wp-image-2148 size-full\" src=\"https:\/\/www.theprojectgroup.com\/blog\/wp-content\/uploads\/2016\/11\/FPA_06.png\" alt=\"Werte der Atributfelder - MS Project Fortschritt anzeigen\" width=\"1033\" height=\"240\" srcset=\"https:\/\/www.theprojectgroup.com\/blog\/wp-content\/uploads\/2016\/11\/FPA_06.png 1033w, https:\/\/www.theprojectgroup.com\/blog\/wp-content\/uploads\/2016\/11\/FPA_06-300x70.png 300w, https:\/\/www.theprojectgroup.com\/blog\/wp-content\/uploads\/2016\/11\/FPA_06-768x178.png 768w, https:\/\/www.theprojectgroup.com\/blog\/wp-content\/uploads\/2016\/11\/FPA_06-1024x238.png 1024w\" sizes=\"(max-width: 1033px) 100vw, 1033px\" \/><\/a><figcaption id=\"caption-attachment-2148\" class=\"wp-caption-text\">Bild 6: Werte f\u00fcr Attributfelder<\/figcaption><\/figure>\n<p>Beachten Sie, dass die verwendeten Formeln nur f\u00fcr jeweils einen der f\u00fcnf diskreten Fortschrittswerte aus dem Men\u00fcband den Wert \u201e<em>WAHR<\/em>\u201c zur\u00fcckgeben.<\/p>\n<p>Wenn Sie auch eine farbliche Hervorhebung von anderen Werten w\u00fcnschen, k\u00f6nnten die Formeln beispielsweise so aussehen:<\/p>\n<figure id=\"attachment_2157\" aria-describedby=\"caption-attachment-2157\" style=\"width: 1065px\" class=\"wp-caption alignnone\"><a href=\"https:\/\/www.theprojectgroup.com\/blog\/wp-content\/uploads\/2016\/11\/Tabelle3.png\"><img data-attachment-id=\"2157\"loading=\"lazy\" decoding=\"async\" class=\"wp-image-2157 size-full\" src=\"https:\/\/www.theprojectgroup.com\/blog\/wp-content\/uploads\/2016\/11\/Tabelle3.png\" alt=\"Modifizierte Feldbezeichnugen - MS Project Fortschritt anzeigen\" width=\"1065\" height=\"218\" srcset=\"https:\/\/www.theprojectgroup.com\/blog\/wp-content\/uploads\/2016\/11\/Tabelle3.png 1065w, https:\/\/www.theprojectgroup.com\/blog\/wp-content\/uploads\/2016\/11\/Tabelle3-300x61.png 300w, https:\/\/www.theprojectgroup.com\/blog\/wp-content\/uploads\/2016\/11\/Tabelle3-768x157.png 768w, https:\/\/www.theprojectgroup.com\/blog\/wp-content\/uploads\/2016\/11\/Tabelle3-1024x210.png 1024w\" sizes=\"(max-width: 1065px) 100vw, 1065px\" \/><\/a><figcaption id=\"caption-attachment-2157\" class=\"wp-caption-text\">Bild 7: Tabelle mit den modifizierten Feldbezeichnungen<\/figcaption><\/figure>\n\n    <p class=\"datamintsbanner\">\n        <a href=\"https:\/\/bit.ly\/3OkEHIx\" target=\"_blank\" class=\"datamintsbanner__link\" title=\"Meilensteintrendanalyse MTA Kostenlos Download MicrosoftProject MSProject FreeMTA Projektmanagement\" style=\"display: block;\">\n            <img data-attachment-id=\"0\"decoding=\"async\" src=\"https:\/\/www.theprojectgroup.com\/blog\/wp-content\/uploads\/2022\/07\/TPG_Header_1400_MTA-Client_de.jpg\" class=\"datamintsbanner__image\" style=\"display: block; max-width: 100%\">\n        <\/a>\n    <\/p>\n    \n<h2 id=\"Kapitel3\">Schritt 2: Balken formatieren<\/h2>\n<p>Im MS Project Tipp\u00a0<a href=\"https:\/\/www.theprojectgroup.com\/blog\/bedingte-formatierung-von-vorgangsbalken-ms-project\/\">Bedingte Formatierung von Vorgangsbalken<\/a>\u00a0haben Sie gelesen, wie Sie Attributfelder zur Formatierung von Balken einsetzen k\u00f6nnen.<\/p>\n<p>\u00d6ffnen Sie jetzt auf der Registerkarte <em>Format<\/em> die Auswahlliste <em>Format<\/em> und klicken Sie auf den Eintrag <em>Balkenarten<\/em>.<\/p>\n<figure id=\"attachment_2149\" aria-describedby=\"caption-attachment-2149\" style=\"width: 1037px\" class=\"wp-caption alignnone\"><a href=\"https:\/\/www.theprojectgroup.com\/blog\/wp-content\/uploads\/2016\/11\/FPA_07.png\"><img data-attachment-id=\"2149\"loading=\"lazy\" decoding=\"async\" class=\"wp-image-2149 size-full\" src=\"https:\/\/www.theprojectgroup.com\/blog\/wp-content\/uploads\/2016\/11\/FPA_07.png\" alt=\"Balkenarten anpassen - MS Project Fortschritt anzeigen\" width=\"1037\" height=\"475\" srcset=\"https:\/\/www.theprojectgroup.com\/blog\/wp-content\/uploads\/2016\/11\/FPA_07.png 1037w, https:\/\/www.theprojectgroup.com\/blog\/wp-content\/uploads\/2016\/11\/FPA_07-300x137.png 300w, https:\/\/www.theprojectgroup.com\/blog\/wp-content\/uploads\/2016\/11\/FPA_07-768x352.png 768w, https:\/\/www.theprojectgroup.com\/blog\/wp-content\/uploads\/2016\/11\/FPA_07-1024x469.png 1024w\" sizes=\"(max-width: 1037px) 100vw, 1037px\" \/><\/a><figcaption id=\"caption-attachment-2149\" class=\"wp-caption-text\">Bild 8: Balkenarten anpassen<\/figcaption><\/figure>\n<p>F\u00fcgen Sie am Ende der vorhandenen Balkendefinitionen f\u00fcnf neue Zeilen ein.<\/p>\n<p>Geben Sie den Zeilen die entsprechenden Namen. Wenn die Bezeichnung des Balkens beim Ausdruck nicht in der Legende angezeigt werden soll, stellen Sie einen<em> <strong>*<\/strong> (Asterix)<strong>\u00a0<\/strong><\/em>\u00a0vor den Namen.<\/p>\n<p>W\u00e4hlen Sie in der Spalte <em>Anzeige<\/em>\u00a0folgende Werte aus:<\/p>\n<ul>\n<li><strong>Normal<\/strong> \u2013 damit wird die Formatierung nur auf normale, nicht aber auf Sammelvorg\u00e4nge angewendet<\/li>\n<li><strong>Aktiv<\/strong> \u2013 damit wird die Formatierung nicht auf inaktive Vorg\u00e4nge angewendet<\/li>\n<li><strong>Attribut(x)<\/strong> \u2013 f\u00fcr jedes der definierten Attributfelder<\/li>\n<\/ul>\n<p>Selektieren Sie jeden der f\u00fcnf neuen Balken und konfigurieren Sie das Erscheinungsbild wie in diesem Fall die Farbe.<\/p>\n<figure id=\"attachment_2150\" aria-describedby=\"caption-attachment-2150\" style=\"width: 1047px\" class=\"wp-caption alignnone\"><a href=\"https:\/\/www.theprojectgroup.com\/blog\/wp-content\/uploads\/2016\/11\/FPA_08.png\"><img data-attachment-id=\"2150\"loading=\"lazy\" decoding=\"async\" class=\"wp-image-2150 size-full\" src=\"https:\/\/www.theprojectgroup.com\/blog\/wp-content\/uploads\/2016\/11\/FPA_08.png\" alt=\"Balkenarten - MS Project Fortschritt anzeigen\" width=\"1047\" height=\"725\" srcset=\"https:\/\/www.theprojectgroup.com\/blog\/wp-content\/uploads\/2016\/11\/FPA_08.png 1047w, https:\/\/www.theprojectgroup.com\/blog\/wp-content\/uploads\/2016\/11\/FPA_08-300x208.png 300w, https:\/\/www.theprojectgroup.com\/blog\/wp-content\/uploads\/2016\/11\/FPA_08-768x532.png 768w, https:\/\/www.theprojectgroup.com\/blog\/wp-content\/uploads\/2016\/11\/FPA_08-1024x709.png 1024w\" sizes=\"(max-width: 1047px) 100vw, 1047px\" \/><\/a><figcaption id=\"caption-attachment-2150\" class=\"wp-caption-text\">Bild 9: Dialogfenster Balkenarten<\/figcaption><\/figure>\n<p>Wenn Sie das Dialogfenster schlie\u00dfen, werden die Balken entsprechend dargestellt. Allerdings fehlt jetzt noch die gew\u00fcnschte Darstellung mit dem zus\u00e4tzlichen\u00a0Fortschrittsbalken.<\/p>\n<figure id=\"attachment_2151\" aria-describedby=\"caption-attachment-2151\" style=\"width: 1507px\" class=\"wp-caption alignnone\"><a href=\"https:\/\/www.theprojectgroup.com\/blog\/wp-content\/uploads\/2016\/11\/FPA_09.png\"><img data-attachment-id=\"2151\"loading=\"lazy\" decoding=\"async\" class=\"wp-image-2151 size-full\" src=\"https:\/\/www.theprojectgroup.com\/blog\/wp-content\/uploads\/2016\/11\/FPA_09.png\" alt=\"Balken ohne Fortschrittsanzeige - MS Project Fortschritt anzeigen\" width=\"1507\" height=\"242\" srcset=\"https:\/\/www.theprojectgroup.com\/blog\/wp-content\/uploads\/2016\/11\/FPA_09.png 1507w, https:\/\/www.theprojectgroup.com\/blog\/wp-content\/uploads\/2016\/11\/FPA_09-300x48.png 300w, https:\/\/www.theprojectgroup.com\/blog\/wp-content\/uploads\/2016\/11\/FPA_09-768x123.png 768w, https:\/\/www.theprojectgroup.com\/blog\/wp-content\/uploads\/2016\/11\/FPA_09-1024x164.png 1024w\" sizes=\"(max-width: 1507px) 100vw, 1507px\" \/><\/a><figcaption id=\"caption-attachment-2151\" class=\"wp-caption-text\">Bild 10: Balken ohne Fortschrittsanzeige<\/figcaption><\/figure>\n<blockquote><p><strong>Wichtiger Hinweis:<\/strong> Von Microsoft Project wird die Anzeige der Balken gem\u00e4\u00df der Definition im Dialogfenster <em>Balkenarten<\/em> sequentiell von oben nach unten verarbeitet. Da im Beispiel hier als letzte Schritte die Balkenfarben gesetzt werden, werden zuvor definierte Eigenschaften \u00fcberschrieben.<\/p><\/blockquote>\n<p>Aus diesem Grund setzen Sie die Definitionen zum Vorgangsfortschritt ans Ende.<\/p>\n<p>Und so gehen Sie dabei vor:<\/p>\n<ul>\n<li>\u00d6ffnen Sie erneut das Dialogfenster <em>Balkenarten<\/em>.<\/li>\n<li>Selektieren Sie die Zeile <em>In Arbeit.<\/em><\/li>\n<li>Klicken Sie auf die Schaltfl\u00e4che <em>Ausschneiden.<\/em><\/li>\n<li>Setzen Sie den Cursor in die erste leere Zeile am Ende.<\/li>\n<li>Klicken Sie anschlie\u00dfend auf die Schaltfl\u00e4che <em>Einf\u00fcgen<\/em>.<\/li>\n<\/ul>\n<blockquote class=\"modern-quote full\"><p>Achten Sie unbedingt auf die Reihenfolge:\u00a0die Definitionen zum Vorgangsfortschritt muss am\u00a0Schluss erfolgen, da diese sonst \u00fcberschrieben werden.<\/p><\/blockquote>\n<figure id=\"attachment_2152\" aria-describedby=\"caption-attachment-2152\" style=\"width: 1052px\" class=\"wp-caption alignnone\"><a href=\"https:\/\/www.theprojectgroup.com\/blog\/wp-content\/uploads\/2016\/11\/FPA_10.png\"><img data-attachment-id=\"2152\"loading=\"lazy\" decoding=\"async\" class=\"wp-image-2152 size-full\" src=\"https:\/\/www.theprojectgroup.com\/blog\/wp-content\/uploads\/2016\/11\/FPA_10.png\" alt=\"Reihenfolge der Formatierungen beachten - MS Project Fortschritt anzeigen\" width=\"1052\" height=\"724\" srcset=\"https:\/\/www.theprojectgroup.com\/blog\/wp-content\/uploads\/2016\/11\/FPA_10.png 1052w, https:\/\/www.theprojectgroup.com\/blog\/wp-content\/uploads\/2016\/11\/FPA_10-300x206.png 300w, https:\/\/www.theprojectgroup.com\/blog\/wp-content\/uploads\/2016\/11\/FPA_10-768x529.png 768w, https:\/\/www.theprojectgroup.com\/blog\/wp-content\/uploads\/2016\/11\/FPA_10-1024x705.png 1024w\" sizes=\"(max-width: 1052px) 100vw, 1052px\" \/><\/a><figcaption id=\"caption-attachment-2152\" class=\"wp-caption-text\">Bild 11: Definition f\u00fcr In Arbeit ans Ende setzen<\/figcaption><\/figure>\n<p>Wiederholen Sie das beschriebene Vorgehen f\u00fcr die Zeile <em>Manueller Fortschritt<\/em>.<\/p>\n<p>Schlie\u00dfen Sie anschlie\u00dfend das Dialogfenster.<\/p>\n<p>Nach dieser \u00c4nderung wird der Fortschrittsbalken in den farbigen Balken angezeigt.<\/p>\n<figure id=\"attachment_2153\" aria-describedby=\"caption-attachment-2153\" style=\"width: 1520px\" class=\"wp-caption alignnone\"><a href=\"https:\/\/www.theprojectgroup.com\/blog\/wp-content\/uploads\/2016\/11\/FPA_11.png\"><img data-attachment-id=\"2153\"loading=\"lazy\" decoding=\"async\" class=\"wp-image-2153 size-full\" src=\"https:\/\/www.theprojectgroup.com\/blog\/wp-content\/uploads\/2016\/11\/FPA_11.png\" alt=\"Balken mit Fortschrittsanzeige - MS Project Fortschritt anzeigen\" width=\"1520\" height=\"240\" srcset=\"https:\/\/www.theprojectgroup.com\/blog\/wp-content\/uploads\/2016\/11\/FPA_11.png 1520w, https:\/\/www.theprojectgroup.com\/blog\/wp-content\/uploads\/2016\/11\/FPA_11-300x47.png 300w, https:\/\/www.theprojectgroup.com\/blog\/wp-content\/uploads\/2016\/11\/FPA_11-768x121.png 768w, https:\/\/www.theprojectgroup.com\/blog\/wp-content\/uploads\/2016\/11\/FPA_11-1024x162.png 1024w\" sizes=\"(max-width: 1520px) 100vw, 1520px\" \/><\/a><figcaption id=\"caption-attachment-2153\" class=\"wp-caption-text\">Bild 12: Balken mit Fortschrittsanzeige<\/figcaption><\/figure>\n<blockquote><p><strong>Passender Lesetipp:<\/strong> <a href=\"https:\/\/www.theprojectgroup.com\/blog\/microsoft-project-fortschritt-in-prozent\/\" target=\"_blank\" rel=\"noopener\">MS Project Fortschritt in Prozent<\/a> \u2013 richtig einrichten und anwenden<\/p><\/blockquote>\n<p>In diesem Beispiel werten\u00a0die Formeln f\u00fcr Attribute nur die Werte 0%, 25%, 50%, 75% und 100% aus. Daher haben davon abweichende Prozentangaben <strong>keine Auswirkungen auf die Formatierung der Standardbalken.<\/strong><\/p>\n<p>Daher sollten Sie die Verwendung von Blau f\u00fcr die benutzerdefinierte Balkenformatierung vermeiden. In diesem Fall sind abweichende Fortschrittsangaben schnell identifizierbar.<\/p>\n<blockquote><p><strong>Tipp:<\/strong> Um abweichende Fortschrittsangaben schnell identifizieren zu k\u00f6nnen, vermeiden Sie die Verwendung von Blau f\u00fcr die benutzerdefinierte Formatierung der Balken.<\/p><\/blockquote>\n<figure id=\"attachment_2154\" aria-describedby=\"caption-attachment-2154\" style=\"width: 1516px\" class=\"wp-caption alignnone\"><a href=\"https:\/\/www.theprojectgroup.com\/blog\/wp-content\/uploads\/2016\/11\/FPA_12.png\"><img data-attachment-id=\"2154\"loading=\"lazy\" decoding=\"async\" class=\"wp-image-2154 size-full\" src=\"https:\/\/www.theprojectgroup.com\/blog\/wp-content\/uploads\/2016\/11\/FPA_12.png\" alt=\"Blau vermeiden - MS Project Fortschritt anzeigen\" width=\"1516\" height=\"243\" srcset=\"https:\/\/www.theprojectgroup.com\/blog\/wp-content\/uploads\/2016\/11\/FPA_12.png 1516w, https:\/\/www.theprojectgroup.com\/blog\/wp-content\/uploads\/2016\/11\/FPA_12-300x48.png 300w, https:\/\/www.theprojectgroup.com\/blog\/wp-content\/uploads\/2016\/11\/FPA_12-768x123.png 768w, https:\/\/www.theprojectgroup.com\/blog\/wp-content\/uploads\/2016\/11\/FPA_12-1024x164.png 1024w\" sizes=\"(max-width: 1516px) 100vw, 1516px\" \/><\/a><figcaption id=\"caption-attachment-2154\" class=\"wp-caption-text\">Bild 13: Abweichender Fortschritt verwendet Standardfarbe Blau &#8211; das sollten Sie vermeiden f\u00fcr eine bessere \u00dcbersicht<\/figcaption><\/figure>\n\n    <p class=\"datamintsbanner\">\n        <a href=\"https:\/\/bit.ly\/3IWzlQw\" target=\"_blank\" class=\"datamintsbanner__link\" title=\"TPG ProjectPowerPack Microsoft 365 Projektmanagement\" style=\"display: block;\">\n            <img data-attachment-id=\"0\"decoding=\"async\" src=\"https:\/\/www.theprojectgroup.com\/blog\/wp-content\/uploads\/2025\/04\/PPP_Blog_Banner_3_1300px-AS_tiny.jpg\" class=\"datamintsbanner__image\" style=\"display: block; max-width: 100%\">\n        <\/a>\n    <\/p>\n    \n<h2 id=\"Kapitel4\">Zusammenfassung: MS Project Fortschritt anzeigen<\/h2>\n<p>In diesem Tipp haben Sie erfahren,<\/p>\n<ul>\n<li>wie Sie Balkenfarben zur besseren visuellen Darstellung des Vorgangfortschritts einsetzen k\u00f6nnen und<\/li>\n<li>welche Aspekte bei der Konfiguration zu ber\u00fccksichtigen sind.<\/li>\n<\/ul>\n<p>Damit haben Sie einen besseren \u00dcberblick \u00fcber den Fortschritt Ihrer Projekte. Das minimiert Ihren Zeitaufwand bei der Kontrolle im Projektmanagement. Probieren Sie diesen Tipp gleich mal aus.<\/p>\n<p>Sie wollen das Gelernte vertiefen, weitere wichtige Tipps erfahren und Ihre Fragen stellen? Dann sind Sie genau richtig beim TPG <a href=\"https:\/\/www.theprojectgroup.com\/de\/ms-project-seminar-einsteiger-schulung\" target=\"_blank\" rel=\"noopener\">Microsoft Project Seminar (Grundlagen)<\/a>.<\/p>\n<blockquote><p><strong>Unsere Tipps zum Schluss: <\/strong>Lernen Sie das individuell anpassbare \u201cThe PPM Paradise\u201d kennen \u2013 <span dir=\"ltr\" role=\"presentation\">die optimale Umgebung f\u00fcr ein unternehmensweites Projekt-, Programm-, Portfolio- und Ressourcenmanagement (PPM). Laden Sie sich jetzt <\/span><a href=\"https:\/\/www.theprojectgroup.com\/data\/Downloads_eBooks\/TPG_PPM_Paradise_eBook_-_TPG_TheProjectGroup.pdf\" target=\"_blank\" rel=\"noopener\"><span dir=\"ltr\" role=\"presentation\">hier das eBook dazu herunter<\/span><\/a><span dir=\"ltr\" role=\"presentation\"> (nur klicken, ohne Formular).<\/span><\/p>\n<p><span dir=\"ltr\" role=\"presentation\">Und abonnieren Sie unseren <\/span><a href=\"https:\/\/www.theprojectgroup.com\/de\/projektmanagement-newsletter\" target=\"_blank\" rel=\"noopener\"><span dir=\"ltr\" role=\"presentation\">Projektmanagement Newsletter<\/span><\/a> mit praxisstarken Artikeln, Webinaren, Podcasts, eBooks etc. f\u00fcr ein h\u00f6heres Reifengrad-Level Ihres Projektmanagements!<\/p><\/blockquote>\n<p><strong>Haben Sie noch Fragen? Dann hinterlassen Sie einen Kommentar, auf den wir in K\u00fcrze antworten werden \u2013 garantiert.<\/strong><\/p>\n<span style='display:none;'>FALSE<\/span><hr \/>\n<p><a href=\"https:\/\/www.theprojectgroup.com\/blog\/wp-content\/uploads\/2020\/03\/Kathryn_Dixon_300x300px.jpg\"><img data-attachment-id=\"6147\"loading=\"lazy\" decoding=\"async\" class=\"wp-image-6147 size-thumbnail alignleft\" src=\"https:\/\/www.theprojectgroup.com\/blog\/wp-content\/uploads\/2020\/03\/Kathryn_Dixon_300x300px-150x150.jpg\" alt=\"Kathryn Dixon\" width=\"150\" height=\"150\" srcset=\"https:\/\/www.theprojectgroup.com\/blog\/wp-content\/uploads\/2020\/03\/Kathryn_Dixon_300x300px-150x150.jpg 150w, https:\/\/www.theprojectgroup.com\/blog\/wp-content\/uploads\/2020\/03\/Kathryn_Dixon_300x300px.jpg 300w\" sizes=\"(max-width: 150px) 100vw, 150px\" \/><\/a><strong>Die Autorin:<br \/>\nKathryn Dixon<\/strong><\/p>\n<p>Kathryn Dixon ist seit Anfang der Neunziger im internationalen Projektmanagement t\u00e4tig und hat bislang vom Projektteammitglied, \u00fcber Projektleiterin bis hin zur Operations Managerin verschiedenste Rollen ausgef\u00fchrt. Dar\u00fcber hinaus verf\u00fcgt sie \u00fcber mehrere Jahre Erfahrung in Human Resources.<\/p>\n<p>Vor Ihrem Wechsel zu TPG Sales Mitte 2015\u00a0war\u00a0Kathryn Dixon bei TPG The Project Group GmbH als Trainerin und Consultant sowie Autorin im Bereich der TPG Produktdokumentation und Social Media Content t\u00e4tig. Als IHK-zertifizierte Trainerin leitete sie u.a. Anwenderseminare zu Microsoft Project und Microsoft Project Server sowie zu Projektmanagement-Methodik in deutscher und englischer Sprache.<\/p>\n<p>Mehr zu Kathryn Dixon auf <a href=\"https:\/\/www.xing.com\/profile\/Kathryn_Dixon\/cv\" target=\"_blank\" rel=\"noopener\">Xing<\/a> und <a href=\"https:\/\/www.linkedin.com\/in\/kathryn-dixon-27701a5\/?originalSubdomain=de\" target=\"_blank\" rel=\"noopener\">LinkedIn<\/a><\/p>\n\n    <p class=\"datamintsbanner\">\n        <a href=\"https:\/\/bit.ly\/3udKM2C\" target=\"_blank\" class=\"datamintsbanner__link\" title=\"Job TPG Bewerbung Wirsuchendich TPG TheProjectGroup Consultant Microsoft PPM Jobs\" style=\"display: block;\">\n            <img data-attachment-id=\"0\"decoding=\"async\" src=\"https:\/\/www.theprojectgroup.com\/blog\/wp-content\/uploads\/2022\/10\/Jobs-3.jpg\" class=\"datamintsbanner__image\" style=\"display: block; max-width: 100%\">\n        <\/a>\n    <\/p>\n    \n","protected":false},"excerpt":{"rendered":"<p>W\u00fcnschen Sie sich eine schnelle \u00dcbersicht zum Stand des Fortschritts der Vorg\u00e4nge in Ihrem Projektplan? Dann ist dieser Tipp zum Thema MS Project Fortschritt anzeigen genau richtig f\u00fcr Sie. Microsoft Project bietet seit Version 2010 die M\u00f6glichkeit, den Fortschritt einzelner Vorg\u00e4nge mit einem Kniff grafisch zu visualisieren. Sie k\u00f6nnen also die Vorgangsbalken in Abh\u00e4ngigkeit vom<\/p>\n<div class=\"read-more\"><a href=\"https:\/\/www.theprojectgroup.com\/blog\/ms-project-fortschritt-anzeigen\/\" title=\"Weiterlesen\">Weiterlesen<\/a><\/div>\n","protected":false},"author":19,"featured_media":9251,"comment_status":"open","ping_status":"open","sticky":false,"template":"","format":"standard","meta":{"footnotes":""},"categories":[24],"tags":[],"_links":{"self":[{"href":"https:\/\/www.theprojectgroup.com\/blog\/wp-json\/wp\/v2\/posts\/2138"}],"collection":[{"href":"https:\/\/www.theprojectgroup.com\/blog\/wp-json\/wp\/v2\/posts"}],"about":[{"href":"https:\/\/www.theprojectgroup.com\/blog\/wp-json\/wp\/v2\/types\/post"}],"author":[{"embeddable":true,"href":"https:\/\/www.theprojectgroup.com\/blog\/wp-json\/wp\/v2\/users\/19"}],"replies":[{"embeddable":true,"href":"https:\/\/www.theprojectgroup.com\/blog\/wp-json\/wp\/v2\/comments?post=2138"}],"version-history":[{"count":25,"href":"https:\/\/www.theprojectgroup.com\/blog\/wp-json\/wp\/v2\/posts\/2138\/revisions"}],"predecessor-version":[{"id":12546,"href":"https:\/\/www.theprojectgroup.com\/blog\/wp-json\/wp\/v2\/posts\/2138\/revisions\/12546"}],"wp:featuredmedia":[{"embeddable":true,"href":"https:\/\/www.theprojectgroup.com\/blog\/wp-json\/wp\/v2\/media\/9251"}],"wp:attachment":[{"href":"https:\/\/www.theprojectgroup.com\/blog\/wp-json\/wp\/v2\/media?parent=2138"}],"wp:term":[{"taxonomy":"category","embeddable":true,"href":"https:\/\/www.theprojectgroup.com\/blog\/wp-json\/wp\/v2\/categories?post=2138"},{"taxonomy":"post_tag","embeddable":true,"href":"https:\/\/www.theprojectgroup.com\/blog\/wp-json\/wp\/v2\/tags?post=2138"}],"curies":[{"name":"wp","href":"https:\/\/api.w.org\/{rel}","templated":true}]}}